

Advanced Creative Stitchery
Last Updated: 01/12by University of Kentucky Cooperative Extension Service

This resource, Advanced Creative Stitchery CT-MMB.711, is available from University of Kentucky Extension, and used here with permission.
Advanced Creative Stitchery
Once the basic embroidery stitches have been mastered, it’s time to move on to more advanced and more difficult designs and patterns. Advanced Creative Stitchery will teach you the challenging stitches used to decorate clothing and home furnishings.
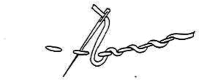
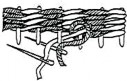
Couching Stitch
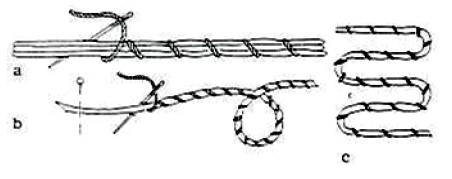
The couching stitch allows you to make large, curving lines or jagged, wiggling lines quickly. You will always “couch” when the yarn is thick and irregular and cannot be pulled through the fabric. It is also good for threads that wear out or fray easily, as does metallic thread.
Choose a few inches of heavy yarn or string and lay it on your fabric. Hold it in place with a pin. Now thread a needle with a different color yarn, one that can be pulled easily through the material. Near the end, at the right, come up just below, but close to, the heavy yarn. Go over the top and back down again. The stitch you make on top can move back and forth at a slant or straight across.
Couching is useful, not only for sewing down thick, heavy yarn but also for a group of thin threads laid down in parallel rows.
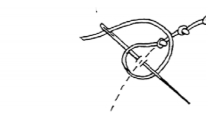
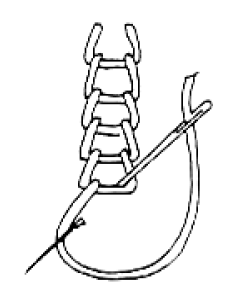
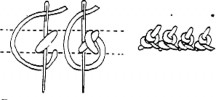
Crossed Thorn Stitch
This stitch is similar to couching. Lay one thread on top of the fabric, and sew it down with couching stitches. Knot a short piece of thread and pull it through, letting it lay loosely on the fabric. Then knot another thread, and make cross stitches over the first to hold it down. When finished it looks like a thorny branch.
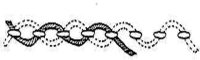
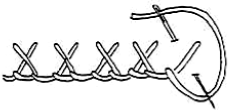
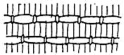
Herringbone Stitch
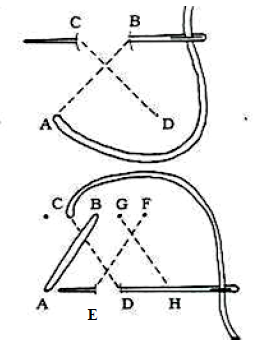
This stitch will surely become one of your favorites. There are so many ways to make this stitch look different. By changing the thickness of the yarn and the size of the stitch, you can make it look either long and lacy or chunky and short.
You sew from left to right. Come up at A. Go down at B. Come up at C, going back to the right. Go down at D. Go a little to the right and come up at E. From this stitch on, each new line is parallel with the one before it – the E - F line is parallel to the A - B one, G - H to C - D, etc.
With a little practice, this stitch moves with a nice rhythm. In dressmaking, it is called the catch stitch.
Split Stitch
This stitch is similar to the stem stitch. But as you move backward on each stitch, split the thread with your needle. This looks like a fine chain stitch.
The next two stitches are variations of simple stitches.
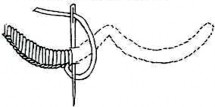
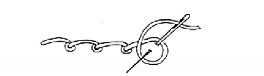
Whipped Running Stitch
This is a combination of two stitches. First, make evenly spaced stitches (running stitch). Then, thread a blunt point needle with a contrasting color of thread and work through the stitches without going through the fabric. Always work the second thread from the same direction. This gives the effect of a twisted cord.
Threaded Running Stitch

Another variation is the threaded running stitch. Work a second thread through the running stitch in a wave by passing the blunt point needle first through the right of one stitch, then through the left of the next stitch. This differs from the twisted stitch in that the second thread is always passed through from the right to the left.
Straight Stitch
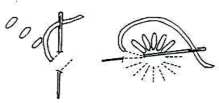
You can make single stitches here and there in a design, or take straight stitches in a ring or semicircle to form a flower. It may be made in various lengths and in clusters, but make sure to separate each stitch from the others.
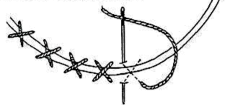
Threaded Backstitch
This stitch is made in the same way as the threaded running stitch. Work a second color in and out of the stitches of the backstitch without piercing the fabric. A third color may be used to make loops on the opposite side as well. (See dotted lines in illustration)
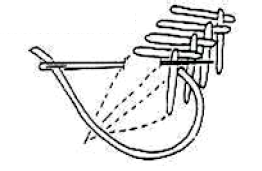
Long and Short Stitch (Kensington)
Used to fill areas in solidly, this stitch can be used to shade colors. The first row is made by alternating long and short stitches. Rows following should have stitches of equal length, worked in at the ends of the short and long stitches. Regularity in the shape of the rows following depends on the shape being filled. Start at the outer edge and work toward the center, or downward, keeping the stitches generally in the same direction. Plan the stitches in an area so that they fill it naturally and gracefully. Mark with a pencil the direction of some of the stitches. Shade the colors into each other in rows.
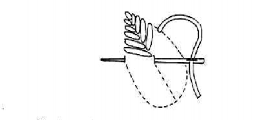
Satin Stitch Leaf

When the area to be covered is large, divide it into smaller sections. Work on one section, changing the direction of the stitches for each section. Keep a neat, firm outline and smooth, parallel stitches.
Open Leaf Stitch
For this stitch, start at the base just left of the center. Insert the needle at the margin part way up and bring it out at the base just right of the center. Continue from the opposite side as shown, alternating from side to side.
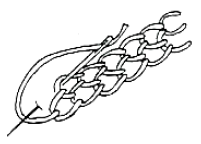
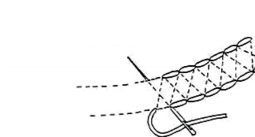
Couched Herringbone Stitch
Begin by making a basic herringbone stitch. Then couch it with a separate thread in a contrasting color where the stitches cross.
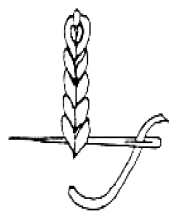
Fishbone Stitch
Starting at the very point of the design, slant each succeeding stitch more until the correct angle is obtained. This leaves alternate sides of each stitch open. Try it with two needles and two shades of the same color to fill in both sides and complete the area.
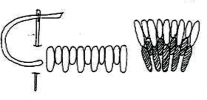
Closed Buttonhole Stitch
Make this stitch in the same manner as above, but with the stitches close together. Use the Closed Buttonhole Stitch to make scalloped edges or fill in an area by working in several touching rows.
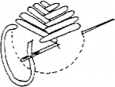
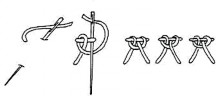
Thorn Stitch

Make sure to use an embroidery frame with this stitch. First place a long thread across the area. Make diagonal stitches from side to side to hold the long thread in position. Use for some stems to produce a special effect.
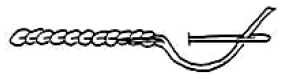
Coral Stitch
Stitch from right to left. Bring thread up through the fabric, holding it with your thumb. Take a small stitch straight across the line, then pull the needle over the thread. Pull up your thread to form a small knot. Repeat. Use for fine stems.
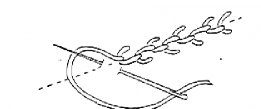
Fly Stitch
Work the Fly Stitch similarly to the Lazy Daisy stitch, making sure the ends of the loop stitch are widely separated. Make a small backstitch to anchor the center in place, bringing the needle up into position for your next stitch. Use as a scattered space filler where a simple, textured background is desired.
Flat Stitch
Work in a similar manner as shown for small leaves and petals. For larger areas do the bands of stitching side by side, interlocking the bands at the sides to give a braided effect at the center.
Chain with Backstitch or Couching

Make a backstitch down the center of the chain or couch down one side of the chain as shown using another color of yarn.
Heavy Chain Stitch
Start with a small vertical stitch. Then make a small loop through the stitch without picking up the fabric. Continue making loops under the one above it.
Roman Chain Stitch
This chain is made like the regular chain stitch except that the loop ends are wide apart. Keep the width of the loops even and make each stitch close to the next one.
Double Chain Stitch
Use this stitch when a broader border decoration is desired. This is done in the same way as a regular chain stitch except that the needle is angled from right to left, then from left to right.
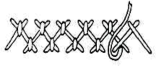
Featherstitch
Working along a single line outline, slant the needle to touch the line. Place it first to the right, then to the left, and so on, alternating each time. Pass the thread under the needle for a buttonhole loop. This is similar to the chain stitch but the loop is open, not closed. The branches may be kept even, with each stitch the same length, or they may be varied in length.
Closed Featherstitch
Working along a double outline, keep the needle pointed along that line instead of pointing it toward the center. Use the same method of alternating the stitches from right to left as in plain featherstitching, but take each stitch at the bottom of the stitch just above it.
Straight Featherstitch
For a slightly different effect, form your stitch in the same way with a double guideline and perpendicular stitches, but make sure the ends of the thread do not meet the stitch above.
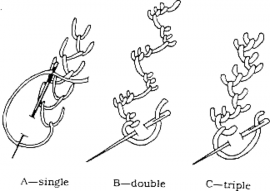
There are many variations of feather- stitching. Take two stitches at each side before alternating sides. This forms a double featherstitch. Or take three stitches to form a treble – or triple – featherstitch. A definite scallop or zigzag may be used as a guide in featherstitching.
Interlacing Stitch
Make two rows of backstitching the distance apart desired, with stitches alternately spaced as shown. With a different color thread, loop new stitches under the back stitches and over the thread as shown, alternating on top and bottom rows.
Lock Stitch
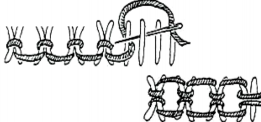
Worked in one or two colors, this stitch is a good banding design. Take a number of vertical stitches spaced either close together or wide apart. With another thread, work from left to right along the bottom section of your stitches. Repeat across the top.
Laid Stitch
Take stitches across the area to be filled, allowing a space between each the size of another stitch. Fill these spaces with another series of stitches. This method conserves yarn and produces smooth, flat stitches, which may also be couched at intervals.
Palestrina Stitch
To start, take a short diagonal stitch bringing the needle out below. Draw the needle up and under the stitch from the top, down, and over the thread as shown. Pull up the thread gently and repeat. For your next stitch, insert the needle to the right from top to bottom, making a diagonal stitch and repeat. Keep stitches short and close together.
Pekinese Stitch

This is most effective when two colors or two different kinds of threads are used. First make a line of fairly large backstitches. Then make looped stitches through the backstitches.
Petal Stitch

This is actually a combination of the Outline Stitch and the Lazy Daisy Stitch, worked simultaneously. Take one stitch of outline, bringing the needle back to the middle of the stitch. Make a lazy daisy to one side, then continue with another stitch of the outline.
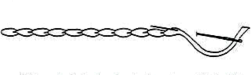
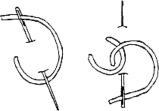
Scroll Stitch
Working from left to right, loop thread around as shown. Take a tiny stitch to the right with the needle over both the top and bottom of the loop. Pull up the thread to make a knot. Space the tiny stitches far enough apart so that the scroll effect is clearly defined.
Sienese Stitch

When worked closely, this stitch makes a good border. First make a vertical stitch, bringing the needle out at the bottom and to the right. Loop the thread around the vertical stitch as shown. Insert the needle at the top of the right, and bring it out at the bottom, ready for the next vertical stitch.
Sorbello Stitch
First take a horizontal stitch, bringing the needle out below and to the left. Loop the thread around the horizontal stitch twice. Then insert the needle below and to the right. Bring it out to the right, even with the horizontal stitch.
Fine Split Stitch
Use this stitch when a fine line is desired. Work this stitch as for an outline stitch, bringing the needle out through the thread as shown. Continue along the pattern.
Wheat Ear Stitch

First make two straight stitches that form a V. Bring the needle out below at the center. Pass the needle under the two stitches, and insert it in the fabric again at the center below, making a chain loop.
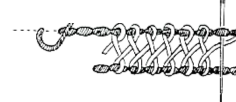
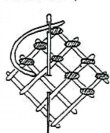
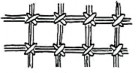
Woven Band Stitch
Make a row of vertical foundation stitches, evenly spaced. Use two needles and contrasting colors of yarn. Work from the top down, with alternating threads. Each thread is brought over one foundation stitch and under the next; the threads twist over each other for each stitch.
Blanket Stitch

The Blanket Stitch is a quick stitch that can be made in the same way as the buttonhole stitch, but more widely spaced. This stitch may be used on the raw edge of material that will not ravel, or on a turned edge of some other fabric. Baste the hem in place first; then place the stitches over the width of the hem, close enough together to hold it firmly in place. These two stitches are often used in appliqué work.
For a more decorative effect, vary the depth of the stitches of either the buttonhole stitch or the blanket stitch. These edgings may be done in varied colors or in a single color. See the diagram for two variations: one is a pyramid border, and one is a saw-tooth border.
Crossed Blanket Stitch
Work on the same premise of alternating angled stitches, but cross the tops of the stitches instead of joining.
Shadow Embroidery Stitch or Crossed Backstitch
On the right side of the work this stitch resembles two rows of backstitch, and on the wrong side it looks like a closed herringbone stitch. Slant the needle and take a backstitch, bringing it out above and to the left. Then work the line above it in the same manner. Work on sheer materials for a shadowy effect.
Seeding Stitch

Take two small stitches side by side, or one small single stitch. Scatter over the area to be filled, alone or combined with other stitches.
Diagonal Filling
Take stitches diagonally across the area to be filled in opposite directions. With a contrasting color of thread, take short stitches across the diagonal stitches where they cross proceeding diagonally from top left to bottom right.
Star Filling

Make an upright cross, then a diagonal cross over it. Work a small cross over the center of the two large crosses. Use in combination with other stitches for filling.
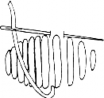
Roumanian Stitch

Use this stitch as a solid filling by making rows of stitches close together, or use it for borders or spot decorations. It is made in two steps. First take a vertical stitch, then fasten it in the center with a short couching stitch.
Oriental Stitch
Since a satin stitch is very popular in Oriental embroideries, it is natural that one of its variations should be named. Use this stitch to cover a fairly large area.
Place long, floating threads of satin stitch vertically over the area. Lay another thread across them, and hold it in place with short anchoring stitches spaced equally, as in couching. These anchoring stitches may match or contrast in color. The couched threads may also be laid across the background threads diagonally.
Trellis and Cross
Take several long stitches across the area to be filled in horizontally and vertically. Where the stitches cross, work a small cross in the same or in a contrasting color of thread. French knots are sometimes made in the center of the squares.
Ermine Filling

Take a vertical stitch. Bring up the needle to the right of this stitch almost at the bottom. Then insert your needle near the top at the left of the upright stitch. Bring the needle out on the left side, near the bottom, and then insert it on the right, near the top. Stitch in rows, alternating the spacing to fill the area.
Fagot Filling

Take four or five stitches close together across the fabric. Tie these stitches together at the middle with two small stitches, sewn through the fabric and around the first stitches to make a bundle.
For More Information:
Baker, Muriel, ed., The Scribner Book of Embroidery Designs. Charles Scribner and Sons, New York, 1979.
Beginning Creative Stitchery, CT-MMB.710, Kentucky Cooperative Extension Service, 2005
Better Homes and Gardens Embroidery. Meredith Corporation, Des Moines, 1978.
McCalls Needlework Treasury. Random House. New York, 1964.
Readers Digest Complete Guide to Needlework. Readers Digest Association. Pleasantville, New York, 2002
Rush, Beverly, The Stitchery Idea Book. Van Nostrand Reinhold Company, New York, 1974.
Wilson, Erica. Crewel Embroidery, Charles Scribner and Sons, New York, 1962.
Wilson, Erica. Erica Wilson’s Embroidery Book. Charles Scribner and Sons, New York, 1973.
Originally published as HE 1-362B; revised 8-81 CT-LMH-115; revised 6-82
Marjorie M. Baker, M.S.
Extension Associate for Textiles and Clothing
Revised June 2005; revised July 2012
Copyright © 2005, 2012 for materials developed by University of Kentucky Cooperative Extension Service. This publication may be reproduced in portions or its entirety for educational or nonprofit purposes only. Permitted users shall give credit to the author(s) and include this copyright notice. Educational programs of the Kentucky Cooperative Extension serve all people regardless of race, color, age, sex, religion, disability, or national origin.