

4-H Cloverbud Activity Book B
The Cloverbud Activity Book is designed to introduce Cloverbuds to many different 4-H areas. The booklets provide activities in Animal Sciences/Animal Life, Expressive Arts, Family, Home, Health, Science and Natural Resources. The record sheet is included in the project book.
Last Updated: 01/10by Kim Drolshagen, Michelle Grimm and Michelle Schroeder
This resource, 4-H Cloverbud Activity Book B, is available from Taylor County Extension, University of Wisconsin-Madison, and used here with permission.
View the source PDF version for the 4-H Cloverbud Activity Book B at Extension Taylor County website
PAGE 1
Produced by: Kim Drolshagen, Michelle Grimm and Michelle Schroeder, 2010
“An EEO/Affirmative Action employer, University of Wisconsin-Extension provides equal opportunities in employment and programming, including Title IX and ADA. Please make requests for reasonable accommodations to ensure equal access to educational programs as early as possible preceding the scheduled program, service, or activity. This document can be provided in an alternative formation by calling UW-Extension at 715-/748-3327 or 711 for Wisconsin Relay.”
PAGE 2
 Table of Contents
- My 4-H Club p. 3
- A Little Bit About Me p. 4
- About 4-H p. 5
- 4-H Pledge p. 6
- My Club and County Activities & Events p. 7
- Animal Ears p. 8
- Feathered Friends p. 9
- Which Birds Have You Seen? p. 10
- Time to Explore on a Nature Hike p. 11
- Operation Espionage p. 12
- Music Time! p. 13
- Straw-Blown Painting p. 14
- Quilt Squares p. 15-18
- Fruity Milkshake p. 19
- Five a Day p. 20-21
- Take Off! p. 22-24
- Sound Vibrations p. 25
- Fly a Kite p. 26
- Nature Rubbings P. 27
- Growing with Groundwater p. 28
- What Do Seeds Need? P. 29
- References p. 30
PAGE 3
My 4-H Club

My Name:
4-H Club Name:
4-H Leader’s Name:
Phone Number:
Other Club Members:
Youth Development Agent’s Name:
Phone Number:
PAGE 4
A Little Bit About Me
Name:
Age:
My Family members:
My favorite activities:
PAGE 5


4-H Club Emblem
The four leaf clover with the letter “H” on each leaf, which stands for head, heart, hands and health.
4-H Club Colors
Green and White. Green symbolizes nature’s most common color. White symbolizes purity.
4-H Motto
“TO MAKE THE BEST BETTER”
This motto challenges everyone involved in 4-H to do the very best job they can.
PAGE 6
4-H Pledge
I pledge:
My Head to Clearer Thinking (Right hand points to forehead)

My Heart to Greater Loyalty (Right hand over heart)
My Hands to Larger Service (Arms slightly bent, palms up)

And My Health to Better Living for My Club, My Community, My Country and My World (Arms at Side)

PAGE 7
My Club and County Activities and Events
Activities and events I was part of:
| Event | Date |
PAGE 8 - Animal Sciences, Animal Life
Animal Ears
Have you ever noticed that animals have larger ears than us? Animals, such as dogs, have much better hearing than we do.
What do you think it would be like if you had animal ears?
Do you think you would be able to hear better or worse?
Why do you think so?
Let’s make animal ears!
Materials:
- Paper or Styrofoam Cups
- Scissors
Procedure:
- Using the scissors, cut the bottoms out of 2 cups.
- Hold the smaller end of the cups up to your ears.
- Have someone whisper, make a loud noise, talk and sing while using your “animal ears.”
- Try placing your ears in different directions to see how the sound changes.
Did the sound change as the direction of the ears changed?
How did the sound change?
Did it get louder or quieter?
Could you hear better with the cups on?
PAGE 9 - Animal Sciences, Animal Life
Feathered Friends
Birds are our feathered friends. We can see different birds outside all year round. Different birds eat different things like, seeds, insects, worms, fruits and nectar.
Can you name any birds you have seen before?
Let’s make a bird feeder!
Materials:
- Bagel, cut in half so there are two circles
- Peanut Butter
- Bird Seed
- String
- Plastic Knife
- Newspaper
- Paper Plate
Procedure:
- Spread newspaper over your table and place some bird seed on the paper plate.
- Tie a string to your bagel so it can be hung outside.
- Using the plastic knife, cover the bagel with peanut butter.
- Dip the bagel in the bird seed making sure all of the peanut butter is covered.
- Find a good tree branch outside to hang your bird feeder on.
- Watch for birds!
PAGE 10 - Animal Sciences, Animal Life
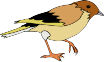
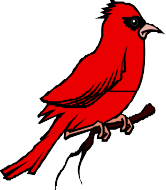
Which Birds Have You Seen?
Watch your bird feeder and go for a nature hike and check any birds you see!
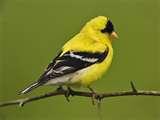
American Goldfinch 

Northern Cardinal 

Blue Jay 

Black-Capped Chickadee 

White Breasted Nuthatch 

American Robin 
PAGE 11 - Animal Sciences, Animal Life

Time to Explore on a Nature Hike
Let’s explore nature by searching for animals!
With some friends and an adult, go on a nature hike and see how many animals you can find. Watch the animals and see what they are doing. Are they eating or sleeping?
Make sure to bring a camera to take pictures or a pencil and paper so you can draw the animals you see!
On my hike I saw a
Describe what it looked like.
Where did you see it?
What was it doing?
PAGE 12 - Expressive Arts
Operation Espionage
It’s time for some detective work!
The mission today is to write a secret message and then reveal it.

Materials: 1 teaspoon Baking Soda
- 1 teaspoon Water
- Grape Juice Concentrate
- Cotton Swab
- Cotton Ball
- Bowl
- Paper or Plastic Cups
- Paper
- Paper Towel
Procedure:
- In a cup, mix 1 teaspoon baking soda with 1 teaspoon water. This is the invisible ink.
- On a sheet of white paper, draw a picture using the invisible ink and a cotton swab by dipping the cotton swab into the ink.
- Let the paper dry completely (this will take around ten minutes.)
- Time to reveal the secret message! Place some grape juice concentrate into a cup. Dip the cotton ball into the grape juice concentrate making sure to squeeze out the extra juice. Gently pat the cotton ball over the paper.
What happened to the message when it dried?
Did your message appear?
What color is the message?
Try using other liquids such as cranberry juice, colored water and apple juice to decipher your secret message!
Did any of these liquids work?
Adapted from: Operation Espionage. PBS Kids Zoom Sci http://pbskids.org/zoom/activities/sci/
PAGE 13 - Expressive Arts
Music Time!
Let’s gather a band and make some music!

Shaker
Materials:
- Empty Plastic Bottle with Lid
- Beads, Pebbles or Uncooked Rice

Procedure:
- Place the beads, pebbles or uncooked rice into the plastic bottle and screw the lid on.
- Try using different sized bottles and different items inside to see if the sound changes!
Finger Plinker
Materials:
- Shoebox with Lid
- Scissors
- Different Sized Rubber Bands
Procedure:
- Cut a circle out of the middle of the shoe box lid using the scissors.
- Place the lid on the shoe box and place the rubber bands around it so they cover the hole in the lid.
- Play by plucking or strumming the rubber bands. Do the different sized rubber bands make different sounds?
Paper Plate Maraca

Materials:
- Paper Plates
- Staples or Glue
- Dried Beans or Small Rocks
- Paints or Markers
Procedure:
- Place some beans or small rocks between two paper plates.
- Secure the paper plates by gluing or stapling around the edges.
- Decorate and shake! Do dried beans sound different than rocks? 13
PAGE 14 - Expressive Arts
Straw-Blown Painting

Let’s create a masterpiece!
Materials:
- A Rimmed Baking Sheet
- Aluminum Foil
- White Paper
- Tempera Paint or Watercolor Paint
- A Cup of Water
- Plastic Straw
Procedure:
- Line the baking sheet with aluminum foil and place the white paper on the sheet.
- Pour tiny puddles of paint in a couple spots on the paper. Add a few drops of water to the paint to help it spread a little easier.
- Take the straw and blow through it on the different puddles. Try blowing hard, soft and in different
- directions to see what happens.

- Lay the painting flat and allow to dry.
PAGE 15 - Family, Home and Health
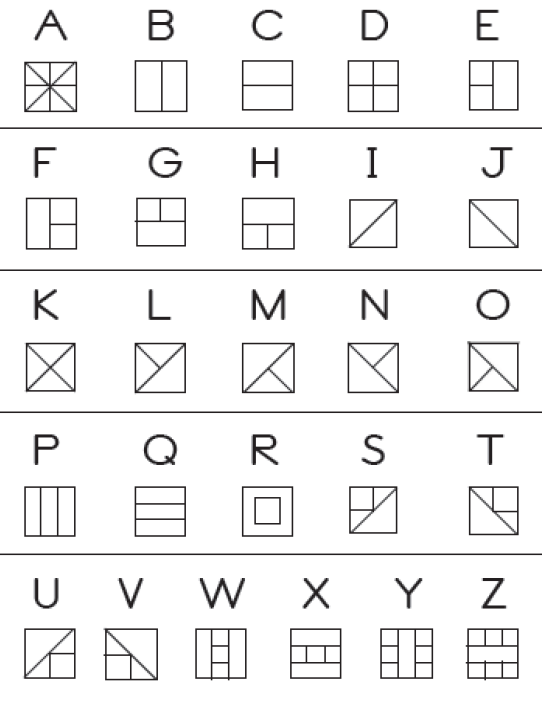
Quilt Squares
Quilts tell art and family stories. Most quilts are made from pieces of fabric or material that is cut into shapes. These shapes are sewn together to make quilt blocks. The blocks are then sewn together to make a quilt.
Let’s make our initials in a quilt square!

Materials:
- 2 – 6”x6” Pieces of White Poster Board
- Several Colors of Construction Paper or Craft Foam
- Square Shape Patterns
- Triangle Shape Patterns
- Glue Stick
- Scissors
- Pencil
- Hole Punch
- Yarn
Procedure:
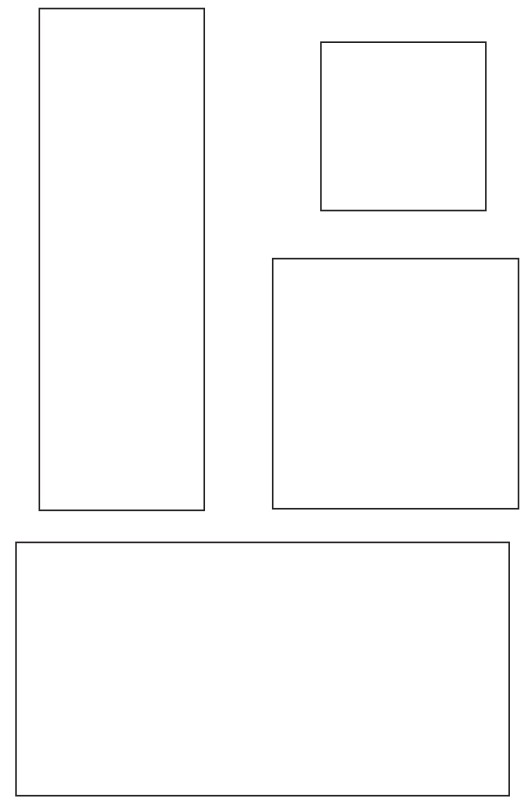
- Find the quilt square on the Quilt Squares Activity Page that matches the first letter of your first name. Choose the shapes from patterns that are in this quilt square.
- Use the scissors to cut out the shape patterns that you need to make your first quilt square.
- Trace the shape patterns onto any color of construction paper or craft foam.
- Use the scissors to cut out the shapes you traced.
- Glue the shapes onto one of the pieces of poster board. Be sure to make your quilt square look the same as the quilt square for the first letter of your name. Set this quilt square aside.
- Repeat these steps for the first letter of your last name.
- Using the hole punch, punch 3 holes in the bottom of your first quilt square and 3 holes in the top of your second square (first letter of last name.)
- Use yarn to tie the two squares together by tying a loop through each set of holes.
- Punch 2 holes in the top of your first quilt square.
- Use yarn to make a hanger for your quilt square initials.
Adapted from: Mini 4-H Before You Sew. By: Roylene Laswell. Purdue University Extension Service.
PAGE 16 - Family, Home and Health
Quilt Squares Activity Page
Adapted from: Mini 4-H Before You Sew. By: Roylene Laswell. Purdue University Extension Service.
PAGE 17 - Family, Home and Health
Square Shape Patterns
Adapted from: Mini 4-H Before You Sew. By: Roylene Laswell. Purdue University Extension Service.
PAGE 18 - Family, Home and Health
Adapted from: Mini 4-H Before You Sew. By: Roylene Laswell. Purdue University Extension Service.
PAGE 19 - Family, Home and Health
Fruity Milkshake
Let’s make a delicious and nutritious snack!
Make sure to ask an adult for help!
Ingredients:
- 2 Cups Skim or Low-Fat Milk
- 1 Cup Diced Fruit such as Apples, Pears, Strawberries, Bananas, Peaches, Berries or Melon
- Dash of Ground Cinnamon
Equipment:
- Blender
- Liquid Measuring Cups
- Dry Measuring Cups
- Measuring Spoons
- Cups
Procedure:
- Wash your hands with warm water and soap.
- In a blender, combine milk and fruit.
- Blend until smooth.
- Pour into cups and top with a dash of ground cinnamon
- Enjoy!
Can you think of any other fruits you could add to your smoothie?
Adapted from: Fruity Milkshake. Kangaroo Jump 5: Power Up the Day Family Newsletter. Michigan State University Extension
PAGE 20 - Family, Home and Health
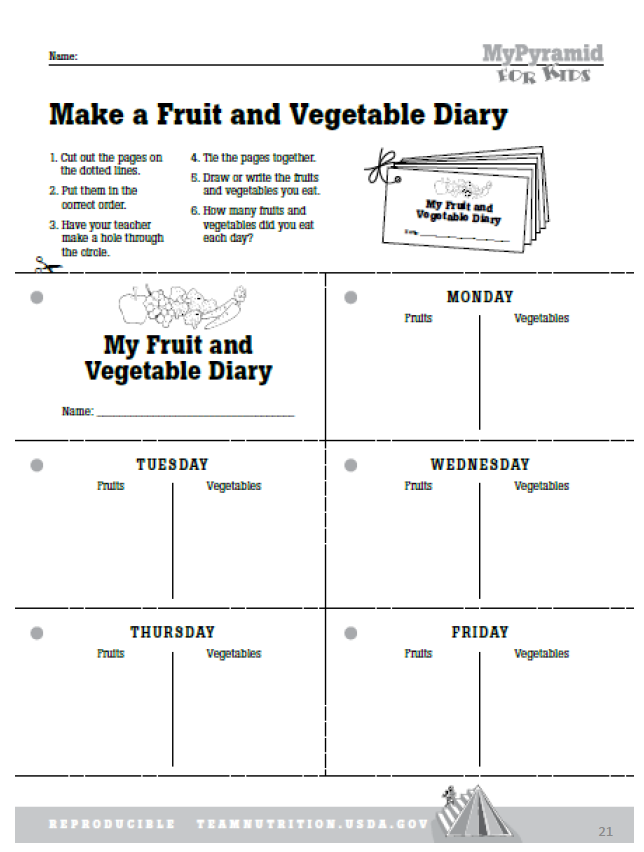
Five a Day
It is important to get 3 servings of vegetables and 2 servings of fruit every day.
Complete the My Fruit and Vegetable Diary to see if you can get five servings of fruits and vegetables a day!
What types of fruits could you try?
What types of vegetables could you try?
How many serving of fruits and vegetables do you need every day?
Adapted from: Lesson 3 Vary Your Veggies and Focus on Fruits. “Make a Fruit and Vegetable Diary.” USDA Team Nutrition. 20
MyPyramid. http://teamnutrition.usda.gov/resources/mpk1_lesson3.pdf
PAGE 21
PAGE 22 - Science

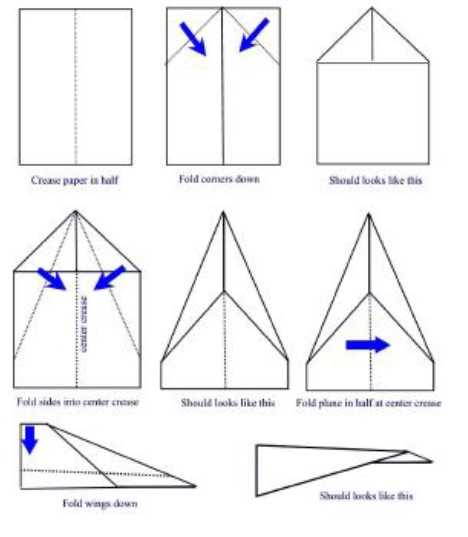
Takeoff!
Construct 2 different paper airplanes to see which one travels farther!
Materials:

- 8 ½” x 11” sheets of paper
- Paper Clips
- Simple Airplane Template and Dart Paper
- Airplane Template
- Measuring Tape
- Pencil
Procedure:
- Construct one airplane using the Simple Airplane Template and one airplane using the Dart Paper Airplane Template.
- Test each airplane by gliding it. Measure the distance they traveled and record them on a sheet of paper. Test each plane three times to compare the results.
- Try adding a paper clip to each plane’s nose.
- Retest each airplane by gliding it. Measure the distance they traveled and record them on a sheet of paper.
Which paper airplane design traveled farther?
Did adding the paper clip change the distance the plane traveled?
Adapted from: Family Flyers – 4-H Aerospace Lesson. ACTas112. University of Wisconsin Extension.
PAGE 23 - Science
A simple Paper Airplane Template (fold at dotted lines)
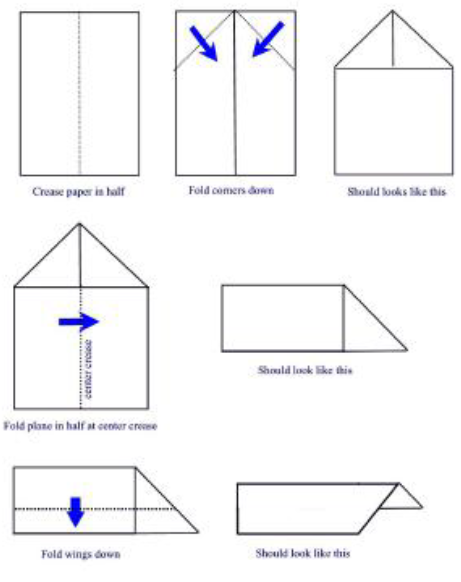
Adapted from: Family Flyers – 4-H Aerospace Lesson. ACTas112. University of Wisconsin Extension.
PAGE 24 - Science
Adapted from: Family Flyers – 4-H Aerospace Lesson. ACTas112. University of Wisconsin Extension.
PAGE 25 - Science
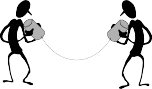
Sound Vibrations
Construct string telephones to hear sound travel.

Sound is a vibration moving through air, water, or some other material. Our ear collects these vibrations and turns them into a signal which is sent to our brain.
Materials:
- 2 Plastic Cups
- String
- Paper Clips
- Sharpened Pencil (For Poking Holes)
Procedure:
- Carefully poke a small hole in the bottom of each cup using the pencil.
- Tie the paper clip to one end of the string.
- Thread the other end of the string through the hole in the inside bottom of the cup. The paperclip will keep the string from going all the way through the hole.
- Then thread the string through the hole in the second cup, but do it from the outside of the cup.
- Tie the second paper clip to the other end of the string. The paper clip should be inside just like the first cup.
- Then, pull the cups so the string is tight and have another person hold the other cup. Talk to the person while they have the cup held to their ear.
What is the farthest distance you can get the telephone to work?
Try using soup cans or different sized cups to see if your telephones work farther apart.
Adapted from: String Telephone. PBS Kids – Zoom Sci http://pbskids.org/zoom/activities/sci/
PAGE 26 - Science
Fly a Kite
Let’s build a kite!

Materials:
- Colored 11” x 17” Paper
- Tape
- Ruler
- Pencil
- Popsicle Stick
- Hole Punch
- 6 to 10 Feet of String or Yarn
- Plastic Bag Cut in 1” Spiral or Streamers
- Crayons or Markers
Procedure:
- Place your paper horizontally on the table with the long ends on top and bottom.
- Fold in half taking the left side to the right side. Leave the paper folded.
- From the folded edge at the top, measure in ½” and mark this spot. From the opposite end at the bottom, measure in 3” and mark this spot. Draw a line to connect these two marks.
- Fold along this line from right to left and then left to right to make a crease for both wings. Pinching the first fold (the straight fold) open up both wings and place a tape along the fold to hold in place.
- Turn your paper slightly to where the point is at top and the angled fold is straight up and down. Take your stick and tape across the top of the wings of the kite.
- Turning the kite over, punch a hole about 1/3 of the way down from the top and about ½ “ from the fold. Secure the hole with tape or a paper reinforcement. Tie your string or yarn through the hole. You can tape the end of the string to a popsicle stick for a handle.
- Lastly, cut a tape the spiraled plastic bag to create a tail for your kite. Decorate your kite and take it out to fly.
PAGE 27 - Natural Resources

Nature Rubbings

Living things all have texture. By making nature rubbings you can see things you may not have otherwise noticed. When you make a rubbing of a leaf, the veins, stem and shape stand out. You can also compare the texture of items by making rubbings of them.
Let’s observe nature!
Materials:
- Newspaper
- Crayons (With Paper Peeled Off)
- Fresh Leaves, Wild Flowers, Weeds, Grasses, Twigs or Reeds
- White Paper
Procedure:
- Go on a nature walk and collect some leaves, wild flowers, weeds, grasses, twigs or reeds.
- Spread newspaper onto the work area.
- Place your findings onto the newspaper.
 Place the paper on top of the leaves or wildflowers you would like to make rubbings of.
- Hold the crayon sideways and rub over the objects.
- Watch the leaves and wildflowers appear as you rub the crayon over them.
- Try making different patterns by arranging the materials in rows or circles.
- Now, let’s go outside with our paper and crayon and make rubbings from surfaces such as brick walls, tree trunks or anything else with texture!
PAGE 28 - Natural Resources
Growing with Groundwater
Plants need water to grow, and it comes from precipitation and groundwater. We are going to build a miniature terrarium that will allow our plants to grow using groundwater as the source of water.

Time to plant!

Materials:
- Clear Jar with Lid
- Gravel
- Potting Soil
- Spray Bottle Filled with Water
- Plant Seeds (Herbs or Vegetables Grow Quickly)
- Large Spoon or Trowel
Procedure:
- Fill the bottom of your jar with 1 to 2 inches of gravel and add about 4 inches of potting soil on top of the gravel.
- Plant the seeds as stated on the package.
- Water generously with a sp