
Successful Home Vegetable Gardening
Having a successful vegetable garden depends on how you garden and on planting enough of the right vegetables at the right time to supply a family’s needs (Table 1). Whether starting with an existing vegetable garden or contemplating an in-ground plot or raised beds, read on for essential information to assure success.
Last Updated: 04/20by Cheryl Moore-Gough M.S., Extension Horticulture Specialist; Eva Grimme, Plant Disease Diagnostician; Laurie Kerzicnik, Insect Diagnostician; Dara Palmer, Montana Master Gardener Coordinator; MontGuide and Patrick Flaherty, Level 3 Montana Master Gardener
Planning
Choose the right location. Sunlight (6 to 8 hours) is essential to growing healthy, productive vegetables. Some plants, such as tomatoes and squash, will require substantial daily sunlight while others, like lettuce and spinach, can prosper with some shade during the day. A flat area with easy access to water is critical (Figure 1).
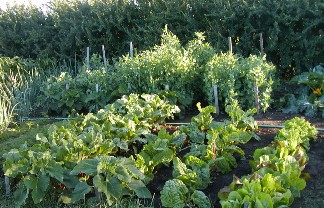
Figure 1: 6 to 8 hours of sunlight is essential to growing healthy, productive vegetables. BY CHERYL MOORE-GOUGH
Take care of the soil. Not all soils are the same; ideal soils are easy to work and have a good mix of silt, sand, clay, nutrients and organic matter. Since most soils aren’t ideal, we often must add soil amendments to improve them. Most Montana soils are alkaline and so well-buffered that it is difficult to change their pH. Have soil tested to determine if a fertilizer or compost is recommended and follow the recommendations of the lab. See the MSU Extension MontGuide, Home Garden Soil Testing & Fertilizer Guidelines (MT200705AG), for more information.
Mapping and organizing. How crops are organized in the garden is also important. Plant tall vegetables like corn on the north or northeast side to reduce shading. Orient all rows in a north-south direction to take advantage of the best sunlight distribution. Plant vegetables that need heavy watering in the fall away from those like onions, potatoes, and other root crops, which need less water in fall in order to be dry for proper storage. Correct spacing between plants is also important to ensure adequate nutrition for each plant and ease of harvest.
Grow appropriate varieties and cultivars for the location. Note the number of “days to maturity” on the seed packet or pot tag of transplants to be sure the cultivar will have time to mature before the end of the season. The days to maturity should be used to compare varieties, but they are not precise for Montana conditions. Days to maturity of vegetables that are direct-seeded refer to the date of planting the seed, while days to maturity of transplants is from the date the transplant is placed in the garden.
To determine the frost-free period, contact the local Extension agent or use the MSU Extension MontGuide Can I Grow That Here? (MT199308AG). The dates given for a locality represent average length of growing seasons, which means the real season length can vary by plus or minus two weeks. Check with the local Extension agent to see if specific diseases or insects are common in the area and purchase seeds of resistant cultivars to help eliminate problems. Don’t pay extra for resistance that may not be needed.
Average growing seasons (frost-free days) in Montana vary widely. Table 1 contains information about average days to maturity, plant spacing, planting depth, and average yields for common vegetables. For more information for your area visit https://mtmastergardener.org/linksandresources/frostfreezedata.html. Because of the large difference in the length of growing seasons, gardeners in different locations in Montana are likely to have very dissimilar gardens.
For a discussion on early season extension, see the MSU Extension MontGuide, Hotbeds, Cold Frames, and Low Tunnels for Montana Gardeners (MT199803AG).
Is it better to direct-seed or use transplants?
Timing. Seeds and transplants should be planted at the right time and in the correct manner for the species and cultivar. This will vary with air temperature, soil temperature and the needs of individual crops.
One of the most useful methods of classifying vegetables for Montana growers is by temperature requirement and hardiness. This allows us to separate cool-season from warm- season vegetables. Cool-season vegetable seeds germinate at a lower soil temperature, and the young plants are frost tolerant and hardy. Cool-season crops grow best with air temperatures between 55° and 65°F, while warm-season crops make optimal growth between 65° and 85°F. See the sidebar, which identifies cool- and warm-season crops as well as which vegetables are typically direct-seeded or transplanted in Montana.
Cool- vs. warm-season plants, direct seed vs. transplants
Cool-season direct seedBeetsCarrotsLettuceParsnipPeasPotatoesRadishesSpinachSwiss chardTurnipCool-season transplantsCabbage familyCeleryLeek and onionsWarm-season direct seedBeansCucumbersSquashSweet cornWarm-season transplantsEggplantPeppersTomatoesFall plantedGarlic
Growing Transplants
Many warm-season vegetables can’t tolerate cold temperatures or mature in our short seasons; start plants indoors or buy transplants from a local nursery or garden center. Additionally, cool-season crops that require additional time to mature, such as broccoli, cabbage, and Brussels sprouts, are also typically grown from transplants to allow them to make good growth during cool weather, ensuring a productive harvest.
If you grow transplants, give them adequate light. The windowsill may appear bright enough, but it isn’t; seedlings may survive, but they won’t thrive. Use a combination of warm and cool white fluorescent bulbs to provide supplemental light or grow lights, which provide the full spectrum of light waves. Two side-by-side workshop light fixtures that each hold two bulbs, with an adjustable shelving system that allows the fixtures to move to keep the bulbs a few inches above the transplants at all stages of growth, works well (Figure 2). Leave lights on for about 12 hours each day after seedlings have emerged.

Figure 2: Transplant growing system. BY CHERYL MOORE-GOUGH
A common mistake is to start transplants too early in the year. The large plants that result suffer greater transplant shock and will yield poorly. Contact the local Extension office for the average date of last frost in spring, then use Table 2 to determine when to start transplants. Note that the actual time needed will vary by temperature, fertility, and light conditions.
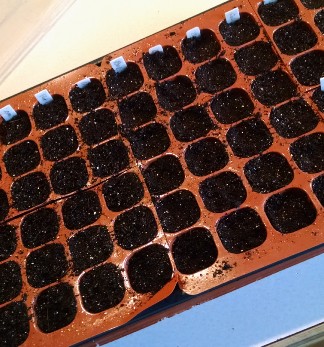
Figure 3: Transplants may be grown in cell packs. BY CHERYL MOORE-GOUGH
Grow most transplants either in flats, cell packs, or in containers (Figure 3). Water media thoroughly the night before sowing. If using flats, sow seeds 1/8 to ¼ inch apart; if using peat pots or cell packs, sow 2 or 3 seeds per pot. Thin excess plants as they grow by snipping with scissors so the roots of the adjacent plants are not damaged by pulling. Sow most seeds about twice the depth of the seed’s widest dimension; read the package. Many tiny seeds, such as many herbs, require light to germinate and need only sit on the media surface. Bottom watering will prevent disturbing newly-sown seeds. Cucumbers, squash, and melons do not transplant well due to their inability to regrow roots damaged during transplanting, so grow them in peat pots or jiffy pellets and transplant them to the garden with an intact soil ball, container and all.
Reusing containers from year to year saves money and resources, but be sure they are clean each time they are used: wash with hot soapy water, rinse with clear water, rinse with a 10% bleach solution, rinse again with clear water, and allow to air dry (Figure 4). This will eliminate any lingering pathogens or insect eggs.
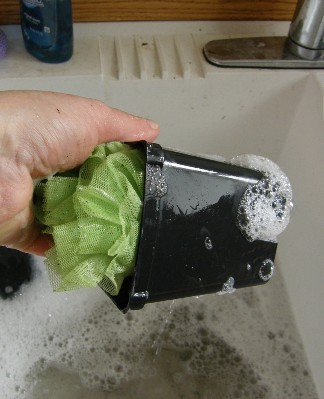
Figure 4: Wash reused transplant containers well. BY CHERYL MOORE-GOUGH
Peat pots used for transplanting should be completely buried to prevent water loss from soil around the plant through the “wicking” action of the peat pot rim being exposed to the air.
Eliminate many pest problems by purchasing a good soilless mix in which to raise transplants. After the second set of true leaves has formed, use a water-soluble balanced fertilizer such as 20-20-20 according to label directions for seedlings.
Seeds of warm-season crops such as tomatoes, eggplants and peppers germinate fastest at 80 to 90°F, while those of other vegetables germinate better at 60 to 80°F. While there is an optimum temperature for seed germination for every vegetable, they will often do just fine under a wide range of temperatures. After emergence, reduce the growing temperature to 60°F at night and 70 to 75°F during the day for most warm-season crops. Cool-season crops and tomatoes do well with 68° F day temperatures and 45 to 50°F night temperatures.
Sow large-seeded vegetables like cucumber and pumpkin into individual containers by pushing the seeds into the mix with a pencil eraser.
Transplant seedlings from flats into cell packs or individual planting pots when they’ve reached an inch in height. Moisten the medium in the new container and, with a pencil, punch a hole in it deep enough to accommodate the root system without crowding. Lift the seedling from the original container with a pencil, spoon, or pot tag, place it into the hole, and gently firm the medium around it.
Water the transplants until water exits through the drain holes or through the peat pot. Test the need to water by squeezing a small amount of medium from the upper half of the container between your fingers. If no water appears, it’s time to water. For soilless mixes such as peat moss, perlite or vermiculite, don’t water if water drips from the mix. Do not overwater or allow transplant containers to sit in water.
Hardening transplants. Whether you grow transplants or purchase them, transplants grown in a greenhouse, or a basement, need to be gradually acclimated to the dry air and intense Montana sun as their protective cuticle is thin. This acclimation is called hardening and needs to be done before setting them in the garden. Slowly reduce the temperature, reduce watering, and increase light levels. Placing plants outside during favorable weather for one to two weeks for cool-season plants, and two to three weeks for warm-season plants before transplanting is a good way to harden them to outside conditions. Bring plants indoors each night when frost is expected.
The Outdoor Growing Season
Early season. For warm-season crops such as cucumber, tomato, pepper and eggplant, sheet mulches help warm the soil and reduce weed competition. Set plants through flaps cut in the sheeting or fabric (Figure 5). Seed cucumber and squash directly into the soil beneath flaps cut in the material. For more transplanting hints see “Setting the transplants” in the MSU Extension MontGuide, Growing Tomatoes in Montana (MT199217AG).
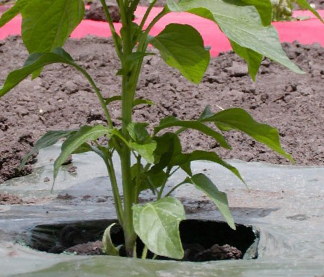
Figure 5: Set plants through flaps cut in the sheeting. BY CHERYL MOORE-GOUGH
Water appropriately. Don’t water too frequently, about once or twice a week, depending on when the top 1-3 inches of topsoil has dried out (except during the seedling stage, which requires frequent, shallow watering). Soil texture will affect how deeply to water, but generally water should penetrate the top 5-6 inches of the garden’s topsoil. Depending on temperature and humidity conditions, this usually will mean about 1-2 inches of water per week from either rain or irrigation.
Control weeds and pests. Weeds will compete with vegetables for water and nutrients, leading to poor yields. To prevent the problems brought by weeds, options include cultivating the garden (typically with a hoe), pulling weeds by hand, using a mulch, or some combination of these methods. The best and easiest time to control weeds is when they first sprout.
Pests include insects or diseases that cause damage to crops. The best way to manage pests is to follow the four-step Integrated Pest Management “PAMS” concept:
Prevention – grow only disease-resistant cultivars;
Avoidance – practice crop rotation, proper planting, watering and spacing, which leads to healthy plants;
Monitoring – keep a close watch for the start of any problems;
Suppression – use appropriate biological or pesticide tools.
Common Insects, Diseases and Problems
A few of the more common problems seen in Montana vegetable gardens are listed.
Insects
Aphids (Figure 6) – Many aphids are host-specific and have secondary hosts (summer hosts). Aphids are sap-sucking insects and the saliva they release from feeding can cause discoloration, curling, distortion, or overall lack of vigor. Monitoring for aphids is critical; check plants regularly during rapid growth. With low densities, aphids are typically kept in check by natural enemies. Hose aphids off with water on the underside of the leaves. Chemical control measures can be important in the vegetable garden if aphids cause significant loss of vigor or if viruses are vectored. There are a variety of relatively low-toxicity contact products including soaps, oils, and botanicals.
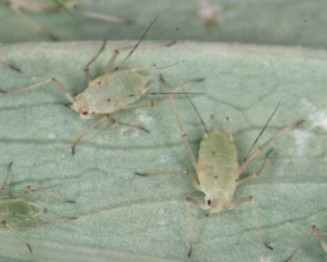
Figure 6: Check the underside of leaves for aphids. BY WHITNEY CRANSHAW, COLORADO STATE UNIVERSITY, BUGWOOD.ORG UGA1326223
Flea beetles (Figure 7) – Flea beetles are highly mobile, about 1/8 inch long, and are black or metallic. They are significant pests of members of the mustard (cabbage, broccoli, cauliflower) and nightshade (tomato, eggplant, potato) families, but also feed on other edible greens. Watch for leaf damage that looks like buckshot holes. Plants that maintain vigorous growth can outgrow a lot of flea beetle injury. Planting “trap crops” such as radishes can often lure beetles away from desired crops. Weed control can also lower flea beetle densities. Cover plants with spun fabric row covers to exclude beetles from the garden, particularly during the vulnerable seedling stage. See the MSU Extension MontGuide Hotbeds, Cold Frames, and Low Tunnels for Montana Gardeners (MT199803AG) for information on row covers. Several contact insecticides are available for control but contact of the adults is critical. Repeated applications would be necessary. In the fall, remove old crop debris to disrupt overwintering sites.
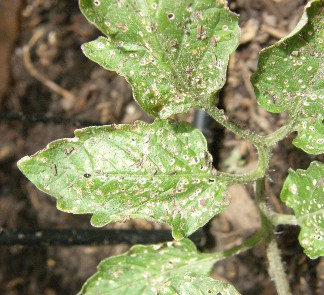
Figure 7: Flea beetles feeding results in a buckshot appearance on leaves. BY CHERYL MOORE-GOUGH
Imported cabbageworm – As an adult, this butterfly is called a cabbage white or cabbage butterfly. The caterpillar is light green and velvety, with a narrow, yellow stripe along its backside (Figure 8). It feeds on plants in the mustard family, resulting in large, ragged holes in the leaves and along their edges (Figure 9). The female lays single eggs on the leaves of its host. Watch for their yellow bullet-shaped eggs on leaves. Handpick and destroy the caterpillars or eggs, use row covers, insecticidal soap, or a caterpillar-specific pesticide variety of Bt (variety kurstaki or Btk).
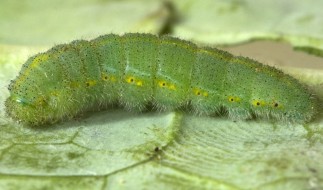
Figure 8: Imported cabbageworm. BY DAVID CAPPAERT, BUGWOOD.ORG UGA5351003
Cabbage loopers – These smooth, green caterpillars have a thin, white line on each side and distinctly move by arching their back to form a loop. The adults are grey, mottled moths with a distinct “Y” mark on each front wing. Cabbage loopers attack all plants in the mustard family and can defoliate an entire crop. Handpick caterpillars, use row covers to prevent infestations, and keep the garden free of plant debris. If chemical control is necessary, use insecticidal soap, Btk, or the active ingredient spinosad.
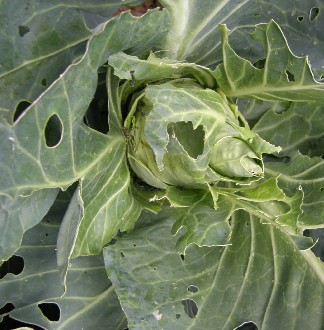
Figure 9: Cabbageworm and loopers cause extensive damage to members of the cabbage family. BY CHERYL MOORE-GOUGH
Leafminers (Figure 10) – Leafminers develop within the leaf tissue, causing necrosis and/or serpentine-like tunnels. The adults are flies that lay distinctive white eggs in small groups on the underside of leaves. The most common in the vegetable garden are the vegetable leafminer, which feeds on most vegetables, and the spinach leafminer, which feeds on spinach, beets, chard, and weeds. While the damage is unsightly, it seldom affects the health of the host plant. Starting in spring, inspect leaves regularly, particularly if overwintering or fall-sowing greens. Crush any maggots within the leaf and cut out the damaged section prior to consumption. Practice good fall sanitation by removing all dead plant material from the garden. Use floating row covers to exclude insects from vegetables and remove any weed hosts such as pigweed, plantain and lambsquarters. Parasitic wasps may provide a limited degree of natural control. Chemical control of leafminers has had limited success and can often make infestations worse by killing beneficial insects.
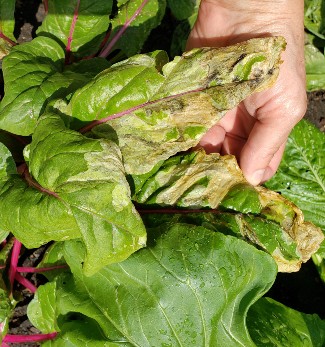
Figure 10: Leafminer feeding damage on Swiss chard leaves is unsightly. BY CHERYL MOORE-GOUGH
Slugs – The gray garden slug is one of the most common in the region and feeds on many different garden plants. Slugs are common during wet conditions or with overwatering. They chew large pieces of foliage and can damage young seedlings. Monitor for slugs on foliage at night, which is when they are active. As they prefer moist conditions, any practices to reduce humidity to the area would be helpful. Avoid watering late at night. Copper flashings and screens can prevent slugs from colonizing the area. Baits can also trap the slugs, and they are attracted to fermenting chemicals. Diatomaceous earth and wood ashes can be spread around the area where slugs feed.
Thrips – Thrips are small, yellow/white insects usually found on the underside of leaves. They cause scarring and silvery-type injuries to leaves and flowers. Leaves can become necrotic with heavy infestations, and distortion can occur. Thrips are commonly associated with drought-stressed plants. For monitoring, use yellow sticky traps to catch winged adults. Overhead water plants with heavy jets of water on hot days on a regular basis, but do it in the morning to prevent issues with powdery mildew. Deadhead all flowers and control surrounding weeds. For chemical control, spinosad is effective against thrips. Other active ingredients that can be used include neem oil, insecticidal soaps, and horticultural oils.
Diseases
Powdery mildew (Figure 11) – This fungal disease appears as white powdery spots on both surfaces of leaves. Prevent this potential problem by planting resistant varieties, limiting moisture on foliage, and spacing plantings for good air circulation. Susceptible plants can be treated with horticultural oils, sulfur or biological fungicides (containing Bacillus subtilis) at the first sign of disease.
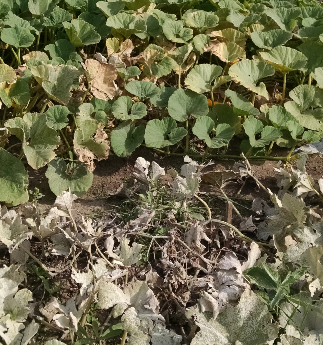
Figure 11: Powdery mildew appears as a powdery white coating on leaves of susceptible plants. BY CHERYL MOORE-GOUGH
Verticillium wilt (Figure 12) – This is a soil-borne fungal disease that attacks plants through their roots. Symptoms include yellow areas on leaves that turn brown, plants that wilt at midday, and leaves that drop beginning at the plant base. Symptoms may occur on only one side of the plant. Tomatoes, peppers, potatoes and squash are common targets. The problems verticillium produces may resemble herbicide damage. Once this fungus is in soil it is very hard to get rid of it, and a seven-year rotation should be used if it is diagnosed in a garden. The best strategy is to plant resistant cultivars – look for “V” and “VF” on seed packets and purchase resistant transplants. If verticillium wilt is suspected in a garden, rake up and dispose of all plant materials after harvest. Consider incorporating green manures into the gardening routine, especially cruciferous plants, to reduce populations of verticillium.
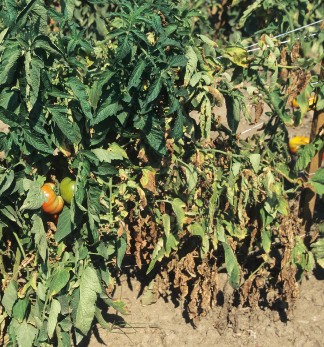
Figure 12: Verticillium wilt on tomato. BY GERALD HOLMES, CALIFORNIA POLY- TECHNIC STATE UNIVERSITY AT SAN LUIS OBISPO, BUGWOOD.ORG #1573861
Aster yellows (Figure 13) – Aster yellows is caused by a phytoplasma, a bacteria-like organism, and affects over 300 plant species. An infection results in severely stunted, twisted plants with yellow foliage and sterile seeds. Affected plants have an upright growth habit, and flower parts may develop into leaf-like structures. The phytoplasma is spread by leafhopper insect vectors. No treatment is available to control aster yellows. Cultural practices include the control of weed hosts (e.g. dandelion, thistle, horseweed, wild carrot, wild lettuce), planting of certified, disease-free seeds and plants, control of volunteer plants, and the removal and disposal of affected plants.
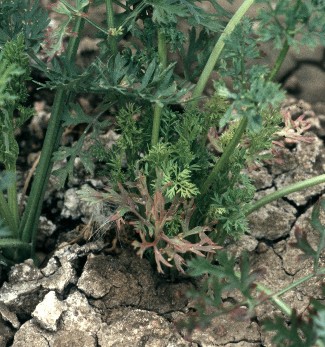
Figure 13: Aster Yellows on carrot. BY WHITNEY CRANSHAW, COLORADO STATE UNIVERSITY, BUGWOOD.ORG UGA1243103
White mold (Figure 14) – This disease is caused by a fungal pathogen and affects garden beans, tomatoes, eggplants, carrots, and zucchini squash. White, fluffy mycelial growth develops during high humidity on stems and fruits, followed by wilt, rot, and death. The pathogen survives as hard structures (sclerotia) in the soil and plant debris. Reduce moisture on leaves and increase spacing between plants to lower disease severity. Remove and dispose of all infected plants as soon as the symptoms appear. Affected plants may be treated with a biological fungicide containing Streptomyces lydicus. Consider treating the affected area in the fall with a biological control treatment containing Coniothyrium minitans to reduce disease severity in the following growing season.
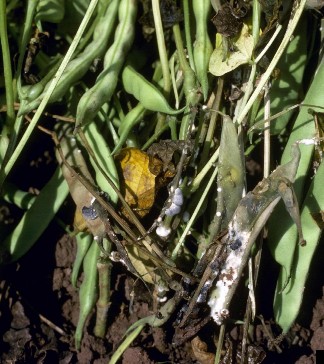
Figure 14: White mold on beans. BY HOWARD F. SCHWARTZ, COLORADO STATE UNIVERSITY, BUGWOOD.ORG #5361385
Other Problems
Physiological leaf roll of tomato plants – This problem starts with leaf margins cupping upward followed by general rolling of the leaves, typically with the lower plant leaves affected first (Figure 15). The severity of the problem appears to be cultivar dependent, with high-yielding and indeterminate cultivars more susceptible. Plant growth and fruit quality are not significantly affected by this condition. Laboratory diagnosis is important as several infectious diseases of tomato also cause leaf rolling. Prevention includes planting in well- drained soils, applying adequate and consistent moisture, and avoiding over-fertilization and severe pruning.
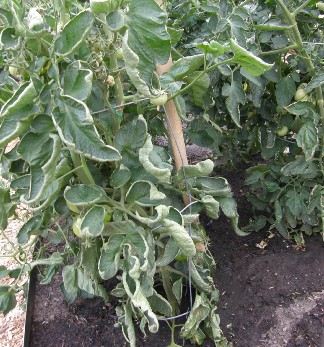
Figure 15: Physiological leaf roll of tomato plants may be confused with diseases. BY CHERYL MOORE-GOUGH
Blossom end rot – A physiological disturbance of tomato, melon, and pepper fruits. This appears differently in each fruit, but on tomato and peppers, it causes a dark, sunken, leathery patch on the blossom end of the fruit (Figure 16). The most common cause is inconsistent watering, which in turn can create a calcium deficiency in the blossom end of the fruit. Calcium moves with water, and most Montana soils are not calcium deficient. Mulching around the plant will help keep the soil moisture level even.
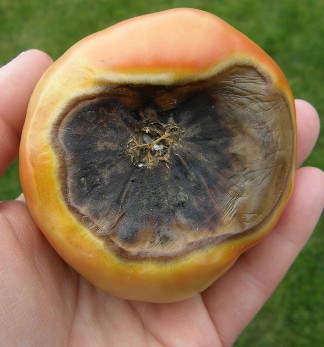
Figure 16: Blossom end rot can occur on tomatoes, melons, and pepper fruits. BY CHERYL MOORE-GOUGH
After the Harvest
Fall Soil Amendments. Fall is the best time to add soil amendments. If soil needs organic matter, and you do not make your own compost, get compost from a reliable source. Compost with residual herbicides has ruined the growing season for many unhappy gardeners. For more information, see the MSU Extension MontGuide, Home Composting (MT199203AG).
Plan for next year with crop rotation. Various crops affect garden soil differently. Some, like tomatoes or corn, are heavy feeders and will quickly reduce nitrogen and phosphorus levels in the soil. Others, such as peas and beans (legumes), add nitrogen to the soil but consume lots of phosphorus.
Even if we add nitrogen and phosphorus to the soil annually, constantly growing the same crop in the same spot can lead to problems with plant diseases and insects building up in the soil.
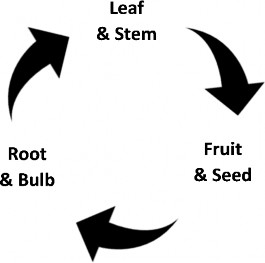
Figure 17: An easy-to-remember crop rotation schedule. BY DARA PALMER
Crop rotation is a strategy for protecting soil fertility and preventing troublesome diseases and insect infestations. Because susceptibility to pests run in plant families, take care not to plant the same plant family in the same place year after year. Several crop rotation strategies can be used, but an easy-to-remember crop rotation schedule is to rotate crops based on the plant part being consumed (Figure 17).
Leaves and stems: Vegetables grown for leaves or flowering parts: kale, broccoli, Brussels sprouts, cabbage
and cauliflower.
Fruits and seeds: Plants grown for fruits: tomatoes, peppers, squash, cucumbers.
Roots and bulbs: Root vegetables: carrots, onions, garlic, beets, potatoes and parsnips.
Fall Planting. Don’t forget that garlic is best planted in Montana in mid-September to mid-October. See the MSU Extension MontGuide, Growing Garlic in Montana (MT199904AG).
Table 1 Garden vegetable planting guide.
| Crop | Maturity | Seeds/ plants per 100 ft. row |
Planting depth (inches) |
Spacing in row (inches) |
Spacing between rows (inches) |
Average yield per 10 ft. row* |
Germination temperature |
|
| Minimum °F | Optimum °F | |||||||
| Warm Season3 | ||||||||
| Beans, Bush | 45–50 | ½ lb. | 2 | 2 | 18–24 | 8lbs. | 60 | 60–85 |
| Beans, Pole | 60–65 | ½ lb. | 2 | 4 | 18–24 | 15 lbs. | 60 | 60–85 |
| Corn, Sweet | 65–85 | ¼ lb. | 2 | 4–6 | 36 | 10 ears | 50 | 65–80 |
| Cucumber | 50–60 | ½ oz. | ¾ | 36–48 | 40–48 | 12 lbs. | 60 | 60–95 |
| Eggplant | 60–80 | 65 plants | 18 | 25 | 7 lbs. | Transplants | ||
| Muskmelon or Cantaloupe | 85–120 | ½ oz. | 1–2 | 18 | 48–84 | 10 fruits | 60 | 75–95 |
| Okra | 55–65 | ¼ oz. | ½ | 12–15 | 36 | Varies | 60 | 70–95 |
| Pepper | 70–80 | 80 plants | 12–24 | 24 | 5 lbs. | Transplants | ||
| Pumpkin | 100 | 1 oz. | 1 | 24–36 | 48–60 | 25 lbs. | 60 | 70–90 |
| Squash, Summer | 55–65 | 1 oz. | 1 | 24–36 | 48–60 | 20 lbs. | 60 | 70–95 |
| Squash, Winter | 55–105 | 1 oz. | 1 | 24–36 | 48–72 | 15 lbs. | 60 | 70–95 |
| Tomato | 60–85 | 40 plants | 18–24 | 36–40 | 15 lbs. | Transplants | ||
| Watermelon | 100–130 | ¾ oz. | 1–2 | 72–96 | 72–96 | 7 fruits | 60 | 70–95 |
| Half Hardy2 | ||||||||
| Broccoli | 70 | 50 plants | 12–24 | 30 | 7 lbs. | Transplants | ||
| Brussels Sprouts | 90–100 | 50 plants | 18–24 | 24–30 | 5 lbs. | Transplants | ||
| Cauliflower | 50–55 | 50 plants | 18–24 | 30 | 8 lbs. | Transplants | ||
| Celery | 85–100 | 200 plants | 6–12 | 30–36 | 10 plants | Transplants | ||
| Chinese Cabbage | 70 | ¼ oz. | 18 | 24–36 | 6 heads | Transplants | ||
| Kohlrabi | 55 | ½ oz. | 1 | 4–6 | 18 | 5 lbs. | 40 | 45–85 |
| Parsley | 70 | ½ oz. | ¾ | 6 | 18 | Varies | 40 | 50–84 |
| Potato** | 80–120 | 12 lbs. | 4 | 10–12 | 36–40 | Varies | Seed pieces from tubers | |
| Radish | 20–30 | 1 oz. | ½ |
To download more free online MontGuides or order other publications, visit our online catalog at our store, contact your county or reservation MSU Extension office, or e-mail orderpubs@montana.edu. Copyright © 2023 MSU Extension We encourage the use of this document for nonprofit educational purposes. This document may be reprinted for nonprofit educational purposes if no endorsement of a commercial product, service or company is stated or implied, and if appropriate credit is given to the author and MSU Extension. To use these documents in electronic formats, permission must be sought from the Extension Communications Coordinator, 115 Culbertson Hall, Montana State University, Bozeman, MT 59717; E-mail: publications@montana.edu The U.S. Department of Agriculture (USDA), Montana State University and Montana State University Extension prohibit discrimination in all of their programs and activities on the basis of race, color, national origin, gender, religion, age, disability, political beliefs, sexual orientation, and marital and family status. Issued in furtherance of cooperative extension work in agriculture and home economics, acts of May 8 and June 30, 1914, in cooperation with the U.S. Department of Agriculture, Cody Stone, Director of Extension, Montana State University, Bozeman, MT 59717 | ||||

