


Montana Avalanche Safety
While winter backcountry recreation is increasing in popularity almost everywhere, Montana often leads the country in avalanche deaths. Most of these tragic accidents are avoidable with some training, foresight and care before entering avalanche terrain.
Last Updated: 08/17by Jerry Johnson, Professor, Montana State University Dept. of Political Science; Jordy Hendrikx, Director, Snow and Avalanche Lab, MSU; and Paul Lachapelle, Associate Professor, MSU Extension Community Development Specialist
THERE ARE OVER 100 NAMED MOUNTAIN RANGES
in Montana and in winter they are the destination of choice for backcountry snowmobilers, skiers, snowboarders, snowshoers, and hunters. While winter backcountry recreation is increasing in popularity almost everywhere, Montana often leads the country in avalanche deaths. Twenty-six people died in avalanches in Montana between 2010 and 2016, a statistic that is only surpassed by Colorado, which has a population more than five times that of Montana. Most of these tragic accidents are avoidable with some training, foresight and care before people enter avalanche terrain.
Avalanches don't just happen to extreme athletes – they can happen to anyone in the winter backcountry. This includes skiers, snowmobilers, hunters, or hikers. Knowing how to stay out of avalanche trouble is key. The skills are easy to understand but can take several years to develop fully. It's important to be able to read and understand the regional avalanche forecast, recognize potentially dangerous terrain, use avalanche rescue gear that consists of an avalanche beacon for finding a buried partner, a probe to locate them in the snow, and a good quality shovel to dig them out quickly.
The Know Before You Go (KBYG) Program is based on five easy principles summarized below. The avalanche preparation website (www.kbyg.org/) helps recreationists review important information before going into avalanche terrain the first time. The lessons of KBYG work for snowmobilers and skiers alike.
Avalanches are not random. They happen when the snowpack, made up of layers of accumulated snow, is disturbed and gravity pulls some of those layers downhill. Most avalanches occur 24 hours after a rapid, heavy snowfall when the underlying layers cannot support the new snow load. Warm weather or rain can also trigger an avalanche, but in 90% of avalanche accidents the most common trigger was the skier/snowboarder or snowmobiler that was caught. These sorts of accidents can be avoided by paying attention to the snowpack, weather, and terrain. Most avalanche accidents are the result of decisions to ski or ride a suspect slope under “conditions of uncertainty.” Safe travel in avalanche terrain is about making the right decision based on what is known about the snow and what it is expected to do.
| AIRBAGS
In recent years the avalanche airbag pack has gained popularity among backcountry skiers and snowmobilers. The pack has an inflatable nylon balloon that deploys with compressed air or a battery-powered blower fan. It is not a replacement for other avalanche gear. Airbags don’t float a person in the snow. When in motion, larger, lighter objects move to the top. This is also true in an avalanche. The moving snow crystals creep under the body and push it upwards. But because of a person's higher weight by volume, this upward movement will then cease and the person will sink back into the snow. In order to avoid being buried in an avalanche, volume must be increased. With a single pull of the activation handle, the balloon inflates and adds to the body's volume, but not weight, and so helps a person stay on the surface. In scientific circles, this phenomenon is also known as inverse segregation. Airbags work and save lives in some situations, but are not a replacement for good decisions or an avalanche class. Still, they are a form of insurance that many people have begun using in the backcountry. |
How do Avalanches Occur?
Avalanches happen when four ingredients are present: a slab of snow, separated by a weak layer, a trigger, and a slope angle steep enough to slide. Slope angle or steepness should be one of the first concerns when traveling in potential avalanche terrain. It is a primary factor in every avalanche. Avalanches are most likely to occur on slopes between 25 and 45 degrees. As a guide, the incline of stairs in a house is 30-35 degrees so it is not that steep. A slab may be soft powder snow a couple of feet deep, or it could be a hard wind slab that is difficult to pierce with a ski pole tip. Weak layers vary on where and how thick they are in the snowpack. Some are slippery ice layers from frozen rain and others are made up of the feathery snow crystals found on cold, clear windless days. An old-timer’s rule of thumb is if the windshield on your car needs scraping there could be a weak layer forming. If those feathery crystals get buried by a few inches of fresh snow, chances are good for avalanche events.
A stable snowpack generally has a more consistent density throughout the pack. However, it can be consistently strong, weak, or have a weaker layer on top of strong snow. A stable snowpack is not prone to avalanching.
Having a slab on a weak layer that’s on top of a good sliding surface constitutes an unstable snowpack, the kind most prone to avalanching. An unstable snowpack contains both weak and strong snow layers. A weak layer consists of poorly-bonded or unconsolidated snow, while a strong snow layer has well-consolidated snow, such as a slab.
|
KNOW BEFORE YOU GO
Get The Gear – The avalanche transceiver, probe, and shovel are the essential tools of rescue. Practice with them and know how to find your partner quickly. Seconds count. Carry the gear and supplies needed to survive an injury or a long evacuation in winter conditions. Be able to communicate with partners and rescuers. Get The Training – Take an avalanche class and learn the basics of avalanches and how they occur, how to make terrain choices, how weather changes snow conditions, how to minimize risk in avalanche terrain and how to make good decisions as a group. Your actions may save an injured member of your party or another group. Keep your skills current with practice sessions and refresher classes. Get The Forecast – In Montana we have three avalanche forecast centers (with one in Idaho that covers Lookout Pass). Read the regional forecast regularly to understand the avalanche hazards you expect to find and understand how different hazards require different tactics. Research and understand the terrain before heading out. Create a riding plan. Set objectives and restrictions based on forecast conditions and group desires and capability and make sure everyone agrees. Let someone know where you plan to go and when you plan to return. Get The Picture – Conditions can change rapidly in winter. Know the weather forecast and be aware of recent avalanche activity in your region. Watch for cracks or collapses in the snowpack. Be especially aware of the wind. Start on small slopes to test the snowpack before committing to larger ones. Continually assess the situation and conditions. Never intentionally trigger an avalanche unless you are sure the area below is clear. Make sure everyone is in their comfort zone and manage the terrain to minimize exposure to the avalanche hazard. Get Out of Harm’s Way – Expose only one person at a time on a slope before you are skiing, riding or crossing suspect terrain. This is especially important advice before helping a buddy find a lost ski or get unstuck in a hazardous location. Don’t stop in an area exposed to avalanche hazard. Eat lunch or regroup well out of the way of a potential avalanche. Think about using two-way radios to stay in communication. Know what a terrain trap is and how to avoid it. |
Assessing Risk and Danger
How dangerous an avalanche is depends on the nature of the slab and how big it is. A soft snow avalanche may appear as a light and fluffy “powder cloud” and do no harm. However, as soon as it stops the snow will set up like concrete trapping anyone in its grip. Slabs will become harder as the snow is blown around and the temperature increases. These hard layers can be incredibly destructive and are often fatal. Experienced skiers and riders refer to the Avalanche Danger Scale (Figure 1) to help them make wise decisions.
The North American Avalanche Danger Scale is a tool used by avalanche forecasters to communicate the potential for avalanches to cause harm or injury to backcountry travelers. Referring to the scale helps explain the potential risk and direct decision making.
Terrain selection is a key to safe travel in avalanche country. The slopes chosen to play or work on are the most important determining factor for avoiding an avalanche accident. Three factors should be considered: the danger rating, the current avalanche problem, and the nature of the terrain. The danger rating is a five-level scale used to communicate the danger of avalanche. The danger is a combination of the expected likelihood, size, and distribution of avalanches.
The avalanche forecast centers provide information to the public by describing current avalanche hazards. Understanding the hazard is essential because it allows us to determine approaches and strategies to inform terrain choices. Most avalanche forecast centers use a set of icons to depict the hazard. It can be helfpul to become familiar with what they mean and how to recognize them (Figure 2).
The avalanche hazard icons are a universal way to communicate the hazards to look for. For example, upon seeing persistent slab hazard, we know that dangerous slab avalanches can be triggered days to weeks after the last storm. They often propagate across and beyond terrain features. In some cases they can be triggered remotely, from low-angle terrain or adjacent slopes. Give a wide safety buffer to address the uncertainty.
| SIDECOUNTRY TRAVEL |
| Avalanches do not occur only in remote backcountry. Skiing lift-accessed terrain just outside the boundaries of many ski areas in Montana can be just as dangerous. Most ski areas allow the public to exit the area via an approved gate. Some ski areas require avalanche equipment to board the lift that leads to the exit gate, others require nothing. Exit signs typically indicate the boundary is being crossed and that the snowpack is uncontrolled by local ski patrol but not everyone understands that they are moving into potentially dangerous territory. In the event of an avalanche or ski injury, rescue is not the responsibility of local patrol. As a result, ski parties should adopt backcountry ski and avalanche practices. Just like the backcountry, this terrain can provide easy access to complex avalanche terrain. The important thing to keep in mind for a safe lift-accessed backcountry experience is that once the ski area boundary is crossed the snowpack is not controlled by area ski patrol and so avalanche hazard increases dramatically; lift-accessed backcountry conditions are still backcountry conditions. |
| SLEDS Snowmobilers should be aware of some of the unique aspects of their sport while in avalanche terrain. Snowmobile tracks often look like “spaghetti” on the landscape, representing multiple laps in deep snowy meadows, or multiple attempts at terrain features like steep slopes, cornices, or rib like features for jumps. Ski tracks by contrast, tend to have less repeated terrain use, and commonly don’t have a high level of repeat use (i.e. dozens) in the same area. One consequence of snowmobilers in hazardous terrain is they may spend more time going over potential trigger points, thereby increasing their chance to trigger an avalanche. Snowmobile trips also tend to be longer in both time and distance. Skiers may cover up to 10 miles in a day; snowmobilers may travel 50-60+ miles on a long tour. Again, every tour is different but this may mean that snowmobilers spend less time in actual risky terrain but may cross many different individual points of risk. We know that avalanche risk can be very different across wide expanses of terrain, so riders need to be extra careful to assess the hazard on slopes that may be several miles apart. A ski party may only expose themselves to 5-10 unique slopes in a day (with different aspects and slopes etc.), and these would typically be within a 5-mile radius. A snowmobiler might expose themselves to 50 or 100+ individual features within a 50-mile area and we know that avalanche conditions can change dramatically over the course of several miles. Best travel practice teaches us to keep an eye on each other. Snowmobile riders are often out of sight for several minutes when riding in rolling meadows for example. If one were to fall into a terrain trap it could take some time to find them. Radios can help in this situation. Finally, one common location for several accidents has been at the base of hillsides where several people are highmarking. It is not unusual for a group to gather and watch below, however, if an avalanche comes downslope, several people could be caught. Make sure to gather off to the side of any potential avalanche path, and don’t go up the hill to help a stuck friend. A release would place two people at risk of being caught. Before anyone tries to ride a big hill, do a first run low and fast to get a feel for the snow. The following website has information about rider safety and awareness: |
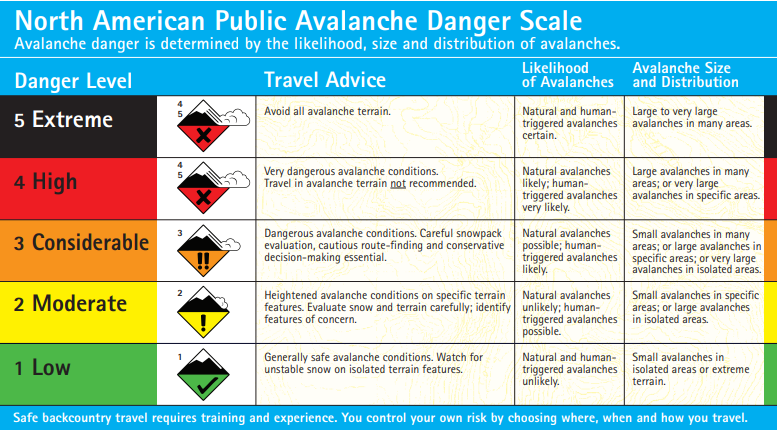
FIGURE 1: Avalanche Danger Scale (source: American Avalanche Association) A video about the danger scale can be found at: www.youtube.com/watch?v=r_-KpOu7tbA
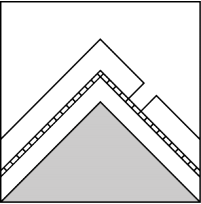
FIGURE 2: Avalanche Hazard Icon. A video on understanding avalanche probems can be found at: www.youtube.com/ watch?v=DkbnT_9-cHU
Preparing for Travel in Avalanche Terrain
Always do a thorough tour plan before heading into the backcountry. Thinking about the process of how current specific avalanche hazards are distributed and on what kind of terrain they may occur, helps ensure a safe tour. This includes not only sloping terrain that could slide, but also the run-out zone of an avalanche far above. Use maps, photos, Google Earth, and local guides to help determine no-go zones. These are places and terrain where the group agrees not to travel on that day no matter what. Save that terrain for later when conditions present less of a hazard.
We are all subject to emotional, psychological, and social influences when trying to make objective decisions about riding a suspect slope or not. A key to staying safe is recognizing when excitement for deep powder or social pressures push us to do something at the limit of our risk tolerance. If we have a planned tour and determined no-go terrain, we may still need to check our behaviors. Good teamwork and communication is important. Use “islands of safety” to watch companions, ride across and ski slopes one at a time and, constantly be asking – is this the right place to be on this particular day?
A comprehensive avalanche course is an investment in avalanche safety. These are often provided with regard to various degrees of detail and experience (termed awareness, level-1, level-2, etc.). Following are some course providers in Montana. Take an avalanche course to further your avalanche knowledge; avalanche education saves lives!
Additional Resources
Avalanche Forecast Centers in Montana
All the forecast centers offer public education and outreach, and post current avalanche conditions and regional weather. They are a great way to start learning more about avalanches, meet people, and get involved in the backcountry.
- The Gallatin National Forest Avalanche Center (GNFAC) is based in Bozeman. The GNFAC covers the Bridger, Gallatin, and Madison Ranges, the Lionhead area near West Yellowstone, and the mountains around Cooke City. http://www.mtavalanche.com/
- The Flathead Avalanche Center (FAC) is based in Hungry Horse, Montana. The center covers an area that includes the Flathead, Swan and Whitefish ranges within the Flathead National Forest and portions of Glacier National Park. http://www.flatheadavalanche.org/
- The Idaho Panhandle Avalanche Center broadcasts a regional weekend avalanche advisory for Lookout Pass on the Montana border. http://www.idahopanhandleavalanche.org/
- For elsewhere in the U.S., go to www.avalanche.org for more information and direction to the relevant regional avalanche advisory center.
Montana Avalanche Course Providers
This is a partial list, others can be found through the forecast centers. Those listed here are top quality educators with considerable experience in Montana’s backcountry. There are also numerous private guides and businesses that provide educational content to paying customers.
Glossary
The study of avalanches is full of interesting specialized terms. Students of snow should take the time to learn them, especially before taking an avalanche course. For a list of more avalanche terms visit: www.fsavalanche.org/encyclopedia/
- avalanche forecast: The U.S. Forest Service operates a network of 14 backcountry avalanche centers in the Rocky Mountains and Alaska. They are supported in large part by public donations and other partnerships. The centers post daily avalanche advisories and offer public education throughout the winter.
- hard wind slab: stiff, cohesive slabs, usually deposited by strong wind drifting or the slabs may be old, hardened layers of snow. Hard slabs are tricky because the stiffness can vary a lot from place to place depending on thickness. You may not trigger a slab in a thick spot, while the edge of the slab may trigger the whole slope. Think of them like a pane of glass stting atop potato chips.
- slab: a cohesive layer of snow with a thinner, weaker layer beneath it. Slabs may be hard, soft, wet or dry depending on conditions. Think of a slab as the layer that slides off the slope to create an avalanche.
- slope: the ground layer on which the snow lays, usually used in conjunction with the angle of the slope on which the various slabs form. Critical slope angles for avalanches are between 25 and 45 degrees. Using a slope inclinometer can help determine slope angle.
- soft slab: composed of new snow that often breaks up into powdery chunks. The most important distinction for people in avalanche terrain is that soft slabs tend to break at or near the feet, while hard slabs tend to break above you, making them much more difficult to escape. Don’t let the name fool you – soft slab avalanches are still very serious.
- trigger: the mechanism that starts an avalanche, often (90%) the skier or snowmobiler that is caught is the trigger for the avalanche. Because of this, avalanche experts like to say “most avalanche accidents happen by choice, not chance.”
- weak layer: the layer of snow between harder layers that fails during an avalanche. The trick to understanding avalanches revolves around knowing where the weakest layer is within the snowpack.