Collecting a Forage or Feed Sample for Analysis
Knowing how to properly collect a forage or feed sample for analysis is vital to obtaining the best overall estimate of forage or feed nutrients. The proper equipment, timing, and placement of samples will help to ensure that you get the best description of your feed and forage quality.
Last Updated: 06/22by Hayes Goosey, PhD, MSU Extension Forage Specialist; Amanda Williams, MSU Extension Agent in Fallon/Carter Counties; Megan Van Emon, PhD, MSU Extension Beef Cattle Specialist; and Rose Malisani, MSU Extension Agriculture Agent in Cascade County
KNOWING WHAT IS IN LIVESTOCK FORAGE IS AN INTEGRAL
part of knowing what livestock are eating, and whether nutritional needs are being met. Forage should make up the basis of most equine and livestock rations, with the exception of animals that are being fed in a feedlot. The ability to develop a ration catered to animals’ needs revolves around the ability to know what is in the feedstuffs animals are eating.
Forage Sampling
Proper forage sampling is essential to obtaining accurate forage quality analyses. Forages may be sampled in the pasture, after harvest and baling, or pre- and post-ensiling and should be a representative sample of the entire “lot.” Having a representative sample can help estimate the nutrient distribution and variation across the field and during harvesting.
A “lot” of hay (or silage) should be fairly uniform and should be taken from a single field or hay stack. The forages in a lot should also be at the same stage of maturity, have had similar management, harvested within 48 hours, and be expected to have similar amounts of anti-quality factors, such as mold, weeds, or rain damage. If there is a large variation in a single lot in terrain (i.e. sloping hills or river bottoms), management, or anti-quality components, it is recommended that multiple samples be taken to best represent that particular allotment of forage.
Sampling Equipment
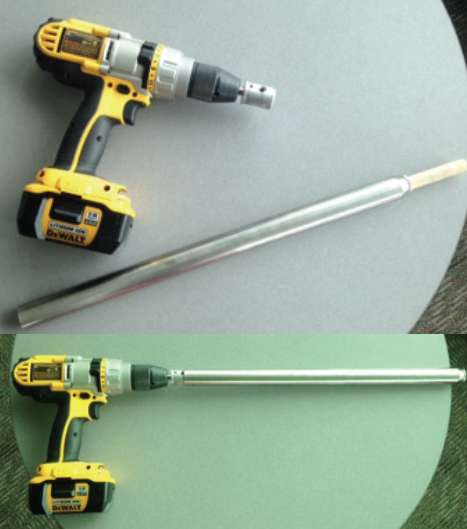
Proper forage sampling equipment includes a forage probe, a bucket, one gallon sized Ziploc sample bags, and drill (depending on the type of probe). A forage probe connected to a drill (Figure 1) makes quick work of bale sampling, minimizes leaf loss, and reaches the bale’s interior for a more composite and representative sample. Forage probes can be purchased online or from most from farm supply stores or by contacting your local county Extension agent. The bucket is used to collect the individual samples collected from the lot. The individual samples are mixed to create the composite sample needed to send off for analysis.

Figure 1. Picture of a typical mechanized hay probe set up, including the drill, probe, and dowel for removing the forage sample.
Sampling Baled Hay
LARGE ROUND BALES
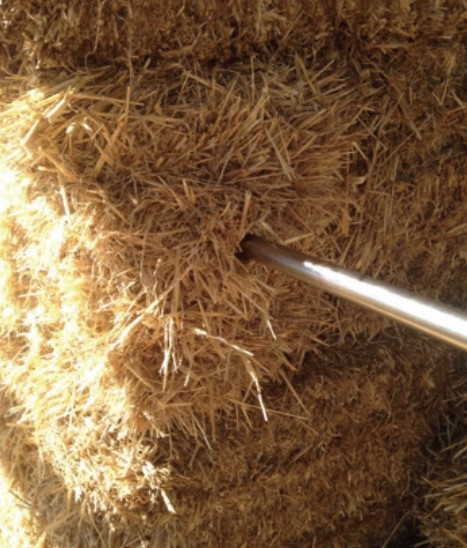
When sampling large round bales, collect cores from 20% of the bales in a lot. Collect one core sample from each bale. Forage samples should be collected from the circumference of large round bales (Figure 2) to receive the most representative sample.
SQUARE BALES
Again, collect cores from 20% of bales in a lot for a representative sample. Core samples should be collected perpendicular to the bale surface on the small end of the bale (Figure 3). Collect one core sample per bale, similar to the large rounds. One core sample from 10% of small square bales is sufficient.

Figure 2. Forage sampling round bales. Collect sample from the curved side. The probe should be perpendicular to the surface.

Figure 3. Forage sampling small square bales. Collect sample from the small end of the bale.
Sampling Standing and Windrowed Forage
In Montana, storing forages for winter feeding is a common ranch practices but also represents one of the largest variable expenses associated with profitable livestock production. Lowering production costs through efficient harvesting techniques then becomes an important part of most ranch operations. The costs associated with baled hay can be reduced 60 to 75% by eliminating the steps between swathing and animal consumption (i.e., baling, stacking, storing, and feeding) by leaving the hay standing in the field or in windrows to be grazed at a later date. There are, however, risks associated with both standing and windrowed forages.
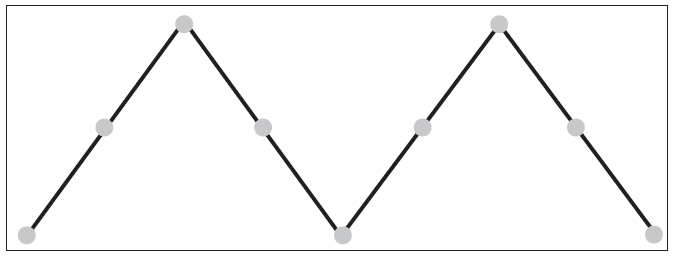
Sampling and analyzing standing or windrowed forage will help to determine if any supplemental feed is required during grazing. With standing forages, clipping sites should be selected randomly throughout the field to provide a representative sample. The easiest way to achieve this is to walk in an “M” pattern (Figure 4) throughout the field, harvesting samples at regular intervals. At each site, the forage should be clipped from a one- square foot area at harvesting or grazing height. For a small field, this might mean every 20 steps, for a large pasture or field this might mean every 50 steps. Sample number should be increased for larger fields in order to obtain a better average. If there are large variations within the field, because of proximity to a water source running through or a hillside, multiple samples should be sent to the lab for best representation of the variations within the field. To properly sample windrowed forages, use sharp long and bladed hedge shears to cut 6-inch sections from several locations in the windrows of each field. This should be done soon after harvest while the forage plants are still moist to avoid leaf loss.
Standing or windrowed forage samples from each field should be kept separate and then cut into 3-inch pieces, placed into your sampling bucket and mixed together to create a representative sample for each field. Samples can then be spread out on paper to air dry for two days or can be frozen prior to shipment for analysis. This will minimize any molding that may occur during shipment to the laboratory.

Figure 4. Recommended sampling pattern for fresh forage analysis in a uniform pasture. “Dots” represent sampling sites within the pasture.
Sampling Silage
FRESH CUT
Sampling chopped silage prior to it being placed in a bag, bunker, or silo provides ample time for analysis prior to feeding. If packed and stored properly, silage crude protein and fiber remain stable during fermentation. Therefore, having the analysis information early will allow for adequate timing to plan for any additional feeds and supplements required. Studies indicate that higher quality forage prior to ensiling resulted in higher quality silage, compared to lower quality or more mature forage that has gone through the same fermentation process. To ensure proper sampling prior to ensiling, multiple samples should be taken from each chopper wagon or truck load. Distribution of stems, leaves, and grain is not uniform throughout a load. Leaves tend to gather on the sides and at the back of the wagon and stems tend to bunch at the center. Four to five handful samples of silage should be collected from each wagon or truck. Samples should be collected from the middle of the load as it is unloading, which will provide a representative sample of stems, leaves, and grain. Samples should be immediately placed in the refrigerator or freezer. Once an entire field is harvested, mix all of the subsamples together in one sample bag and freeze.
UPRIGHT SILO
Sampling should take place from the silo after fermentation is complete. This can take several weeks for the entire process to occur and a stable pH to be achieved. Do not sample from the top or bottom two to three feet of silage, rather remove the top or bottom spoilage from the silo so that a more representative sample can be collected for analysis. When using a silage unloader, grab 10-12 handfuls or one to two pounds of silage from the unloader while it is running. Caution should be taken to avoid any hazards, and equipment should be turned off before reaching in to obtain a sample. Samples should be sealed tightly in a sample bag and stored in the freezer until shipping.
SILAGE BUNKER
Do not take samples from the face of the bunker, this does not yield a representative sample and creates safety concerns, such as the collapse of the silage wall. Samples obtained from the face of the bunker typically have variable estimates of crude protein and fiber content. The best way to obtain a sample from a bunk is to use a face shaver or loader bucket to scrape across the face, similar to removing silage for feeding, which creates a pile of silage on the bunker floor. Collect six to eight handful samples from the pile and mix well in the sample bucket after which take a handful sample for analysis. Store the sample in the freezer until shipment.
SILO BAG
Samples can safely be collected from the silage face when stored in a silo bag. After silage is removed from the bag, creating a fresh silage face, collect five to eight handful samples across the entire silage face. Mix the samples together in the sample bucket and place a representative sample in the Ziploc sample bag. Immediately freeze after collection.
Core samples can also be taken from silo bags. Approximately 8-10 core samples should be collected from a silo bag along the entire length and both sides of the bag. Securely tape the core holes closed after collecting the sample to prevent oxygen infiltration and spoilage. Similar to the hand grab samples, mix samples in the sample bucket and collect a representative sample in a sample bag for analysis. Freeze immediately upon collection.
Sampling Total Mixed Rations (TMR)
Collecting a representative sample of a TMR is a fairly straightforward process. Mix the TMR using normal procedures and distribute in the bunk as normal. Collect hand grab samples along the entire bunk line from the top, middle, and bottom of the TMR and place in the sample bucket. The sample bucket should be about ? full when all of the samples have been collected. On a smooth, clean surface, dump the bucket of the TMR samples out and leave the coned sample intact. Using a yard stick or thin piece of wood, cut the sample in half, and then half again, which creates a representative sample. Keep this quarter of the sample for analysis.
Sample Handling
All forage and feed samples should be stored in the freezer until shipping for analysis. To minimize the chances for mold formation or spoilage during shipping, ensure your samples arrive at the laboratory as quickly as possible. It is not a good idea to allow samples to sit outside, especially in the sunlight, during the day.
For any of these forage types, a sample of approximately 0.5-1.0 lb is usually sufficient for most labs. However, it is always a good idea to check with the lab to in order to ensure there is adequate sample available. Some labs even provide a sample collection bag.
Conclusion
Proper sampling is important when trying to determine forage nutrient quality. Once you have obtained an adequate, representative sample, the next step is to send it to a certified forage testing laboratory for analysis. Directions on how to interpret a forage analysis can be found in the MontGuide, Forage Analysis Interpretation (MT201609HR). For a complete list of current certified forage testing labs, visit the Forage Extension website at http://animalrangeextension.montana.edu/forage/.

