


Hotbeds, Cold Frames, and Low Tunnels for Montana Gardeners
The use of cold frames, hot beds, and low tunnels are excellent ways to extend the Montana growing season, providing a substitute for greenhouses. The gardener with limited space inside the home can use these to start transplants from seed. These simple structures also allow Montana gardeners to plant small vegetable crops earlier in the spring and enjoy fresh vegetables later into the fall.
Last Updated: 04/20by David A. Baumbauer, PhD, MSU Plant Growth Center Manager and Cheryl Moore-Gough M.S., Extension Horticulture Specialist
COLD FRAMES ARE HEATED ENTIRELY BY THE SUN’S
rays; hotbeds use the sun’s rays and other sources of heat to maintain adequate temperatures. Consider the temperature and other climatic conditions of the location.
When choosing between a cold frame or hotbed, consider the plants to be grown. Hardy plants such as cabbage need only simple, inexpensive facilities, but heat-loving plants such as peppers and eggplants should have more elaborate facilities for successful production in some of the colder areas of Montana.
Structure and Design
Figure 1 illustrates a typical cold frame design. When selecting materials to construct a cold frame, keep in mind that the inside of the structure will be warm and humid. Wood is the primary structural component in most cold frames. Some manufactured cold frames use aluminum, plastic, and fiberglass.
Most home gardeners use the materials they have available. When selecting wood, consider its rot resistance qualities. The heartwoods from cedar and redwood provide excellent rot resistance as does pressure-treated lumber. Pine, fir and spruce need to be treated to increase rot resistance. Do not use creosote or pentachlorophenol preservatives because they release vapors that can be toxic to plants. Copper naphthenate is non-toxic to plants when dry.
Old storm windows make an excellent cover for the structure. If there are none available, there are many substitutes for glass. Heavy plastic film is an inexpensive covering but may last only one season. Plastic windowpane, polycarbonate panels or ridged fiberglass panels will last for several years and hold up against wind.
Make sure all joints are tight against the weather. The structure should have a top lid that can be propped open at different heights to allow for ventilation, watering and easy planting. The cover must be secured against wind gusts.

Figure 1: A typical structure design.
Location
Locate hotbeds and cold frames on a well- drained sunny southern exposure. If the site does not have good soil, remove and replace it with sandy loam to a depth of 30 inches to provide good drainage. The back of the structure should face north and be built into a hillside, against a building, or banked to give protection. Use soil to bank the outside of the frame structure to increase heat holding capacity. Protect the frame from prevailing winds. Locating the structure near water and electricity is helpful.

Figure 2: Night insulation for cold frames and hotbeds.
Operation
An easily read maximum/minimum temperature thermometer is essential for a hotbed or cold frame. Locate the thermometer out of direct sunlight so it can be read without removing the cover.
Cool season plants grow best at 55° to 65°F while warm season plants grow well at 65° to 75°F. If air temperature inside the frame goes above 85°F, ventilate by opening the top or install an automatic lifting device to maintain desired temperatures. Monitor the temperature to ensure the structure does not cool down too much. While most gardeners worry about trying to heat the frame, there is much danger from the sun overheating and killing young plants in early spring.
A method of retaining heat during the night is necessary. Use old quilts as an insulating cover (Figure 2). Rigid foam board insulation also works well. Rocks, bricks and water-filled bottles placed inside the structure absorb heat during the day and give off heat during the night.
Heating Methods for Hotbeds
Electric heating cables placed directly under the soil work well in a hotbed (Figure 3). These cables, equipped with a thermostat at the soil surface, can provide gardeners with a reliable source of heat. Follow manufacturer recommendations when installing the cables.
Hotbeds can also be placed on the south side of a house next to a basement window that can be cracked open to allow heat to enter the hotbed.
Fresh animal manure can be an economical source of heat for a hotbed (Figure 4). Place fresh manure in a compact pile near the hotbed. The manure will begin to compost and release heat. When heating begins, place the manure giving off the most heat in the bottom of the frame, the rest over it. After each 3- or 4-inch layer has been added, pack it down so that the bed surface is even. The amount of manure used will depend on air temperature. Twenty-four to 30 inches of manure will be sufficient in most cold climates. When the temperature drops below 90°F in the frame, spread about 6 inches of garden loam over the manure, removing clods to create a fine seed bed. Do not sow seed for one week, or until the first strong heat is over and any weed seeds in the soil have had a chance to sprout. Remove these weed seedlings before planting.
The biggest drawback to using manure is that the temperature in the hotbed cannot be regulated easily. This method will also take some initial shovel work to dig a pit inside the frame 24 to 36 inches deep. Change the manure yearly.

Figure 3: Hotbed with electric cable.

Figure 4: Hotbed with composting manure.
Planting Suggestions for Transplants
To grow transplants successfully, sow seeds in rows spaced about 4 inches apart when the soil temperature at 1/2 inch is 70 to 75°F. Seeding depth should follow recommendations on the seed package. After seeding, pack down soil firmly, water gently so that the small seeds are not washed out, cover with soil and leave until the seedlings break through the soil.
When seedlings appear, give them plenty of sun and good ventilation. Excessively high temperatures make plants weak and leggy and more prone to disease. To avoid foliar diseases, water early in the day to avoid wet foliage at night.
Tomatoes and crucifers from 6-8 weeks old are most desirable for transplanting into the garden. Vine crops take up to 4 weeks and peppers about 10 weeks. As conditions within the frame are nearly optimal, transplants must become adapted to the harsh field environment using a technique called “hardening.” Do this by reducing moisture 7–14 days prior to transplant and gradually expose plants to field conditions. Set the transplants out into the garden on a cool, cloudy day at the recommended time. Hardened cabbage, lettuce and broccoli will stand light frost. Tomatoes and peppers are frost tender. See the MSU Extension MontGuide Successful Home Vegetable Gardening in Montana (MT202002AG) for additional information on growing transplants and hardening techniques.
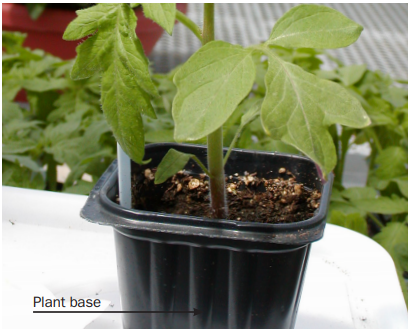
Figure 5: Set transplants a little deeper than they grew in the flat or container. BY CHERYL MOORE-GOUGH
Plants will not suffer many setbacks in growth during transplanting if they are moved with a block of moist soil around their roots. Set transplants a little deeper than they grew in the flat or container (Figure 5). Shade plants if possible to help newly set transplants get a better start, especially if planted on a hot day or in a windy spot.
Planting Suggestions for Extending the Season
The home gardener wishing to harvest fresh vegetables earlier in the spring may also harvest into the fall using cold frames or hotbeds. The height of the structure will limit the vegetables to plant. Sow seeds in rows spaced 6–8 inches apart, following the previous Planting Suggestions for Transplants section. Continue to follow the instructions in the Operation portion of this MontGuide. Prop the cover wide open during the heat of summer. Keep the soil moist, but do not overwater.
Low Tunnels

Figure 6: Low tunnels help extend the growing season. BY DAVID A. BAUMBAUER
Gardeners desiring to protect larger areas might consider constructing spun-poly row cover low tunnels (Figure 6). Low tunnels are ideal for early-spring-planted leafy greens, especially when combined with raised beds. Low tunnel hoops are bent from ½” diameter galvanized metal electrical conduit. Low tunnel benders are available from garden supply firms and are designated by how wide a hoop they form. A four- foot-wide hoop is appropriate to span most garden beds and requires a 10 foot piece of conduit per hoop. Hoops should be spaced 4–6 feet apart and are secured by pushing the ends 1½ feet into the soil. Poly-spun row cover is designated by the amount of frost protection that the material provides. A row cover with a 4°F frost rating offers a good balance between heat retention without blocking too much sunlight. A four- foot-wide hoop requires a ten-foot-wide piece of spun poly row cover to ensure sufficient width to anchor the material to the ground with weights.
Spun-poly row covers don’t require manual ventilation as the material allows for air exchange. Spun-poly row cover offers additional benefits such as blocking desiccating wind and excluding insects such as cabbage moths and flea beetles. The row cover needs to be removed if overhead irrigation is used, and during flowering for plants that require pollinating insects to set fruit such as tomato, pepper and squash.
Which System Should Be Used?
Hotbeds, cold frames and low tunnels are three simple ways to extend the gardening season. Which system is appropriate depends on the amount of area to protect, desired crops, and the amount of labor to construct and maintain the equipment. Hot beds require the most labor to construct and maintain and are best suited for producing warm-season vegetable transplants. Cold frames are best suited for gardeners desiring a small protected space and last longer than spun- poly covered low tunnels. Low tunnels are the least expensive to construct of the three systems, but they provide the least amount of frost protection, and the spun-poly material will need to be replaced every two to three years.
Acknowledgements
The authors would like to acknowledge the original authors of this MontGuide, Ron Carlstrom, former Gallatin County Extension Agent and Dr. Bob Gough, former Extension Horticulture Specialist.