Growing Tomatoes in Montana
This MontGuide explains the importance of choosing the right cultivar and provides a list of suitable tomato cultivars for Montana. It also suggests starting with transplants and tells how to prepare the soil and set out the plants. It discusses weed control, pruning and thinning, water, and possible problems.
Last Updated: 07/19by Cheryl Moore-Gough, Extension Horticulture Specialist
IT’S NOT EASY TO GROW TOMATOES IN MONTANA.
Extremes in temperature, dry climates, poor soil quality, water shortages, and short growing seasons can make the production of fine tomato fruit difficult. But there are plenty of ways to improve the chances of producing all the vine- ripened fruit your family can eat.
Choose the right cultivar
Tomato-growing neighbors know what cultivars work best in your area. Ask them for recommendations. But, until you can develop your own list of “best cultivars,” here are some rules of thumb to use to make selections.
Grow early ripening cultivars: For a sure crop, select very early to early-mid season cultivars that ripen their fruit in 60 to 70 days. If you garden in a mountain valley or other areas with the shortest growing seasons, choose very early cultivars. If you garden in areas at lower elevations where growing seasons are longer, choose early to early-mid season cultivars.
Determinate or indeterminate types: Determinate cultivars are compact plants with a concentrated period of fruit ripening. This growth habit is useful to process a large batch by canning, freezing, or dehydrating for winter use. Indeterminate cultivars are vining, setting fruit as they grow and continuing to produce up to frost. Plant indeterminate varieties to harvest over a longer time and typically use them fresh.
Generally, determinate types form compact plants that may not need to be supported, but both types usually benefit from some kind of cage or trellis for ease of harvest. Indeterminate types trail along the ground if they are not supported. The sprawling plants’ foliage keeps the soil cool and moist and can delay fruit ripening, as well as encouraging rot. Support plants to help fruit ripen earlier and keep them clean.
Heirloom or Hybrid: Heirlooms and other open-pollinated cultivars “come true” if you save seed; that is, the progeny will strongly resemble the parent plant. Saving seed from the best, earliest, tastiest fruit helps to tailor a crop to your growing conditions. (See MSU Extension Montguide Harvesting and Saving Garden Seeds, MT199905AG). Hybrid varieties (designated by “F1”) are traditionally bred for characteristics of disease resistance, acidity, sugar content, and earliness. Progeny from seeds saved from hybrid plants will not be predictable because of their genetics.
Start with transplants
Our season is too short to direct-seed tomatoes into the garden, so start with transplants. If you grow them yourself, allow six to eight weeks to produce a good transplant (avoid the temptation to start them too early), and be sure to have enough light. Even windows that face south do not have adequate light in early spring for good plant growth.
Garden soil is seldom satisfactory for starting tomato seeds. Instead, use a sterilized or pasteurized commercial seeding mixture.
Sow seeds into flats or individual containers. If sowing them into flats, transplant them once or twice as they grow. This can be time consuming, but it will force the plant to develop a more fibrous root system that will better tolerate transplant shock. Seeding mixes contain few, if any, nutrients, so when “stepping up” the plants to larger containers, change to a standard potting mix.
Keep the containers well-watered and the soil temperature at about 70 to 75°F until the seedlings are up. Then, let the surface of the media dry slightly between waterings to help control disease. Never let the media dry to the point that seedlings wilt. Fertilize plants once each week with a balanced, water soluble fertilizer such as 10-10-10, following label directions.
If you purchase transplants, select those that are stocky, about six to eight inches tall, and have no flowers or fruit. Transplants that are large enough to have set flowers or small fruit will suffer excessively from transplant shock and do not make good garden plants. They’ll ripen a few fruits early, then often stop production. Transplants should also be certified disease-free.
Preparing the garden soil
Tomatoes produce best in well-drained, sandy loam soil that is high in organic matter. If soil is poor, spread a layer of well-rotted manure or compost two to three inches deep in the garden and work it into the soil. Do this in autumn or very early spring before planting.
In early spring, turn under the phosphorus equivalent of about six pounds of triple super phosphate, or mono ammonium phosphate, or their equivalent (25 pounds of 10-10-10) per 1000 square feet of garden area. The extra phosphorus will help plants set and ripen fruit. Sidedress the plants once with a complete fertilizer about one month after planting.
Don't overfertilize the garden. Excess nitrogen delays fruit set and maturity, which can hinder crop ripening before frost.
Setting the transplants
Set tomatoes after the danger of frost has passed. Plants need about four square feet/plant to develop normally.
Late afternoon of a calm, cloudy day is the best time to set out transplants. Set stocky plants an inch deeper than they grew in the container and tamp soil firmly around roots. Water plants well with a liquid starter solution, high in phosphorus, to eliminate air pockets around roots, to settle the soil, and to provide water and nutrients for rapid growth. If the transplants are spindly, with long stems, lay the stems horizontally, about an inch below the soil line and cover, letting only the upper several inches of the stem and top leaves protrude above the surface. Tomato stems will produce roots along their entire length, helping the plant develop a robust root system and larger, healthier plants.
Right after transplanting, cover new plants with water walls, hotkaps, or row covers. Row tunnels are constructed of spun, bonded or woven geotextiles. Floating row covers lie on the plants and hold heat in the plant canopy to speed growth. They tend to blow away where there’s wind or cause damage to young plants, unless anchored. Construct low tunnels with heavy gauge wire to support the material and keep it off plants. These all protect plants from drying winds, increase humidity within the canopy to decrease wilting, and moderate temperatures during early season weather fluctuations.
Another way to speed plant growth in our short season is to use plastic film mulch on the soil surface. Organic mulches may be used in summer, but they keep the soil cool in spring and slow plant growth. Red film mulches speed soil warming and thus root growth, help control weeds, speed tomato fruit ripening and conserve soil moisture. Black mulches conserve soil moisture and control weeds, but in Bozeman trials, did not significantly raise soil temperature. Mulches are a subject of ongoing research, and new colors and materials are constantly being released, including photodegradable and wavelength-selective products. If using plastic, prepare the soil as normal, including moistening the soil. Then roll out the mulch and secure the edges with landscaping staples or stones and soil. Punch holes for plants, and set the transplants through the holes. Irrigation water will get to the plants through the planting holes. Be sure the soil is moist before laying plastic.
Weed control
Cultivation
Tomato feeder roots are shallow, so cultivate only the top inch or so of soil. Keep your hoe sharp and scrape, don’t chop, the soil’s surface.
Mulching
This is a good way to control weeds. Some plastic mulches will warm the soil and speed fruit ripening and some will not; organic mulches such as shredded leaves, clean straw, or aged grass clippings (where no herbicides have been applied) cool the soil and can delay fruit ripening but add valuable organic matter to the soil.
Pruning and staking
Remove all suckers growing in stem axils as they will grow into another main stem, setting additional fruit that may not ripen in our short growing season (Figure 1).
Pruning can help speed ripening but can also increase the incidence of blossom end rot, fruit cracking, and sunburn. In general, don’t prune determinate cultivars. You may prune indeterminate cultivars to up to three main stems and top the plants after the fifth cluster of blossoms has set, or about August 1. This will help speed ripening.
All indeterminate cultivars should be supported, especially in windy areas. This speeds ripening and makes cultivation easier. To stake at planting, pound strong stakes (at least two inches by two inches) into the ground, leaving about five feet above ground for the plant. Use soft baler twine or old nylon stockings and loose knots to tie the plants to the stakes. Trellises may also be used for indeterminate types. Determinate types often benefit from being supported in cages made specially for this purpose, and their fruits are much easier to harvest, especially large- fruited cultivars.

FIGURE 1. Pinch out suckers growing in stem axils.
Fruit and flower thinning
Standard size tomato fruits need about eight to nine weeks to ripen after they set. If a cluster has set and there is not enough time remaining to ripen before frost, cut it off, and continue to remove all flowers that form. This will give the remaining fruit a greater chance of ripening.
A Partial List of Recommended Tomato Cultivars for Montana
Early to mid-season small-fruited:
Sungold I
Super Sweet 100 I
Sweet Baby Girl I
Yellow Pear I/H
Watering
Water plants deeply, wetting the upper foot of soil every week. Frequent, light watering does more harm than good and wastes water.
Physiological disorders
Cracking Fruit: (Figure 2) cracking can be concentric (cracks around the diameter of the fruit) or longitudinal (cracks running from stem to blossom end). Both are often caused by water applied to the fruit surface. Always water the soil and try not to get water on the fruits. Overwatering during fruit ripening may also cause cracking.
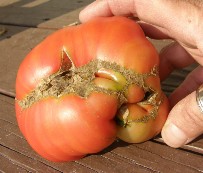
Catfacing: (Figure 3) This abnormal fruit development, resulting in puckering and leathery-looking scars on the fruit surface, is caused by poor pollination, cool early season weather, or herbicide damage. It is often seen on fruits that have set before transplants have been planted in the garden.
Leafroll: This can be caused by moisture stress, virus, or by exposure to herbicides containing 2,4-D. This chemical is common in broad-leaved lawn herbicides. Depending upon its cause, leafroll may substantially affect yields. Do not consume fruit from plants contaminated with herbicide.
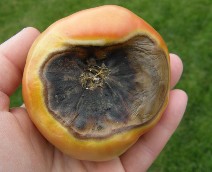
Blossom End Rot: (Figure 4) This dry, sunken, leathery, brown spot near the blossom end of fruit is not caused by a pathogen but by a calcium deficiency in that portion of the fruit. Often this is not due to an actual calcium deficiency in the soil but to fluctuating soil moisture levels, as calcium moves with water in the plant. To reduce its occurrence, be sure there is an even moisture supply and never allow drastic changes in soil moisture to occur. Mulching will help keep moisture levels even. Don’t overfertilize during the growing season and be sure to add phosphorus to the root zone during planting.
Poor Fruit Set: Blossoms will drop without setting fruit if the weather is cool (below 55°F) or very hot (above 90°F), the winds are dry, or there is too much water or fertilizer. If necessary, apply fruit setting compounds, especially early in the season, to improve production. These are plant hormones called auxins that help the plant set fruit artificially. Many of these fruits will be seedless and may not get as large as those set normally. Follow label directions.

FIGURE 2. Cracking of the fruit can occur when cold irrigation water hits warm fruits, or by overwatering during fruit development.

FIGURE 3. Catfacing can be caused by poor pollination, cool early season weather, or herbicide damage.

FIGURE 4. The leathery look of blossom end rot, typically caused by inconsistent watering.
Pest Control
Insects
Cutworms: Wrap paper collars around the stems of new transplants or place a band of hydrated lime, diatomaceous earth, or wood ashes around the plant stems, keeping it at least two inches away from green tissue.
Fruitworms: Pick and destroy infested fruit.
Hornworms: Hand pick these worms and destroy them. They feed on top of the foliage at night and hide beneath it during the day. Look for them in early morning or in twilight when they are most visible. Also, look for their pellet-like green droppings beneath the plant.

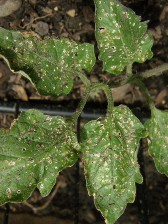
Flea beetles (Figure 5, left): These are very small beetles that eat tiny round holes in the leaves. Treat the plants with a labeled insecticide, or use row covers to exclude them.
Leafhoppers: These suck out the chlorophyll, causing a pale green-white color to develop in the leaves. Treat with a labeled insecticide or use row covers.
Diseases
Fusarium and Verticillium wilts: These diseases can become serious in hot weather. The soil-borne fungus enters roots and blocks water and food transport, causing leaves to roll upward and plants to wilt at midday. Lower leaves yellow and fall. Wilting usually starts on one side of a branch or plant, then moves to the other. Remove infected plants, including roots. Plan crop rotation to not plant tomatoes or their relatives (peppers, eggplant, potatoes, petunias, etc.) on the same plot of ground for at least five years (a “five-year rotation”) and use resistant cultivars. These will be labeled with "V and/or F" to indicate resistance to verticillium and/ or fusarium. Lastly, don’t damage the plant when cultivating, and maintain a uniform irrigation plan to avoid plant stress.
Bacterial canker: This disease results in temporary drooping of the upper and outer leaves, with wilting progressing from the bottom leaves upward. The leaves turn brown and die, but the petioles remain green and firm and attached to the stem (they drop off in fusarium infection). Stems begin to show yellow-gray streaks, which crack open to form long cankers. Fruit set can be reduced. Use a three-year rotation if bacterial canker is diagnosed, plant treated seed, and ensure good sanitation by removing and destroying infected plants.
Western Yellow Blight (Curly Top): The leaflets roll upwards, become thick and crisp and turn a dull yellow with purpling veins. Plants appear erect and stunted and roots may die. This virus is transmitted only by beet leafhoppers. Don’t plant tomatoes near beets, watermelons, beans, spinach, squash or peppers. Dig out and destroy all infected plants.
Autumn Care
If you anticipate an early frost, harvest all tomatoes that have begun to turn to at least a light white-green or blush. These have reached what is called the breaker stage. Researchers tell us that fruits develop a layer of cells (abscission layer) that seals off the fruit from the plant when they reach this stage. This layer prevents additional sugar accumulation in the fruit so when picked at this stage, they will have full flavor after they ripen off the vine. These ripen best where the temperature is about 65°F.
You may also pull vines with intact fruit and hang them upside down in a well-aerated shed to ripen. Vines in the garden could be covered with newspaper or sheets, which will protect them from a light frost. There is no garden protection from a heavy frost or temperatures below about 27°F.
Acknowledgements
The author would like to acknowledge the original author of this MontGuide, Bob Gough, former Extension Horticulture Specialist. All photos by Cheryl Moore-Gough.

