


Pruning Fruit Trees in Montana
Although we prune fruit trees to maintain their shape and to remove dead and diseased wood, the main objective of pruning is to increase fruit production. This MontGuide gives advice to the home fruit grower starting with the planting year.
Last Updated: 11/19by Cheryl Moore-Gough, Extension Horticulture Specialist
WE PRUNE FRUIT TREES TO IMPROVE TREE STRENGTH
and shape, induce branching, and improve fruit quality. With a well-pruned tree, spraying is easier, air circulation within the tree is improved and potential for disease is reduced. However, excessive pruning encourages excessive shoot growth and pests, and reduces fruit quality. Never combine pruning for size, shape and fruit production with removal of diseased wood.
Planting Apple and Pear Trees
Pruning and Training to a Central Leader
The day a tree is planted is the day to begin to prune and train for future production. Too often backyard growers plant apple and pear trees and leave them untended for several years. This neglect results in poor growth and delays fruiting. But it is just as bad to overprune young fruit trees. This makes them overly vigorous, more susceptible to fire blight, and delays the onset of bearing.
The primary purpose of pruning a young tree is to control its shape by developing a strong, well-balanced framework of scaffold (main) branches. Remove unwanted branches. Train non-trellised trees to the central leader system, pruning in late winter or early spring (February or March).
Prune young trees (up to 10 years of age) lightly. Encourage lateral branching on the major limbs with summer tipping. Tipping (cutting) the terminal one-half inch of the new terminal growth to a healthy outside-facing bud in mid-June will encourage lateral branching.
First Growing Season
Figure 1 shows the proper height at which to head the whip (unbranched tree) at planting. This brings the top and the roots back into balance and causes buds just below the cut to grow into scaffold branches (Figure 2).
Begin training the tree when 2 to 3 inches of new growth have occurred. Position limb spreaders between the main trunk or branch and the new succulent growth (Figure 3) to force the new growth outward and upward, forming strong crotch angles of 45° to 60°. Allow the most vigorous upright branch to remain growing straight up; this becomes the central leader.
One Year Old
A tree’s age is measured from the date of planting. You may plant a 2-year-old tree, but the year after planting it’s called a one-year old tree.

Figure 1. Head the top of a whip at 30 inches at planting to promote branching.
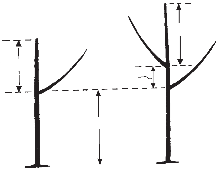
Figure 2. Spacing of scaffold limbs, starting about 18 inches above the soil line.
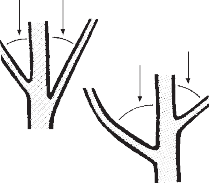
Figure 3. Narrow angle crotches of less than 40 degrees are weak and subject to breaking. Spread them early to increase the angle and the branch strength.

Figure 4. Weak crotch (left) and ideal scaffold branch crotch (right).
Several branches should have developed after the first growing season and if they were spread, should have the same range of good crotch angles (Figure 4). Now develop a strong central leader and framework of scaffold branches. Leave only four to five main scaffold branches spaced around the tree and about six inches apart vertically. Looking down on the tree, a typical arrangement of the branches might appear something like the inset in Figure 5. Make sure the ends of the scaffold branches (after they have been pruned back) are below the end of the central leader.

Figure 5. Placement of the scaffold branches around the tree framework.
Special note: Occasionally a tree does not grow as well as it should during the first year. If this is the case, prune it back to a whip and start over again. You may delay fruiting by a year but will have a stronger tree.
Second Growing Season
During the second growing season, develop a second layer of scaffolds 2 to 3 feet above the previous scaffolds (Figure 6).

Figure 6. Placement of the scaffold branches around the tree framework.
Two Years Old
Limb spreaders help promote earlier fruit production, improve tree shape, promote strong crotch angles and improve fruit color. You can use purchased limb spreaders, short pieces of wood with sharpened nails driven into each end, or sharpened metal welding rods. Don’t spread limbs to more than 60 degrees from the main trunk. Wider crotches form limbs that produce vigorous suckers (“watersprouts”) along their topside and may reduce the terminal growth on the branch. Leave spreaders in place for 1 to 2 years until the branch “stiffens up.” Always spread the branches before pruning. This pruning consists entirely of removing undesirable upright limbs and reducing the length of new shoot growth by one-fourth.
Succeeding Years
Continue to head back the new terminal growth by one-fourth each year and remove upright, broken, or diseased limbs. Maintain the central leader as the highest point on the tree and keep the ends of the primary and secondary scaffolds below the top of the tree. Prune the trees every year in late winter or early spring (February or March).
Pruning and Training Stone Fruit Trees to an Open Center
Stone fruits are those with a stone or “pit” surrounded by flesh or pulp, including plums, cherries, and peaches. Prune these fruit trees to an “open center” to produce a vase-shaped tree. Stone fruits are susceptible to many diseases and an open center allows greater air circulation and light penetration, both of which reduce disease incidence.
At Planting
If you purchase a whip or one with no branches 20 to 30 inches above the soil line, head the tree to 26 to 30 inches after planting.
If you purchase a tree with healthy branches 18 to 30 inches above the soil line, select three or four, one at each of the compass points. These should develop from the main trunk at a 60- to 90-degree angle. Cut them back by half their length to a healthy outside-facing bud. Remove all branches that are less than 18 inches above the soil line and cut the tree off just above the topmost selected scaffold. During the summer trim shoots that begin to grow toward the center of the tree.
One Year Old
Prune trees in early spring. Stone fruit trees are susceptible to Cytospora canker; if pruned in the winter they cannot protect the wounds from infection.
First, remove damaged branches. Second, cut out vigorous upright shoots on the inside of the main scaffolds.
By the end of the first season, trees should begin to take on the typical open vase shape. Select three or four permanent scaffold limbs and remove the others. Permanent scaffolds should be distributed evenly around the trunk, approximately 6 inches apart vertically. Do not select primary scaffold limbs that are directly above one another. Head primary scaffolds back to 36 inches in length.
Two Years Old
During the second winter after planting, develop secondary branches on the primary scaffolds. Select two to three limbs per branch that developed during the second summer. They should be spaced 6 to 8 inches apart, 18 to 24 inches from the main trunk and on opposite sides of the branches. Remove all other limbs. Head the chosen side limbs back by one-half. Head back the primary scaffold by up to half. Remove large, vertical growing limbs on the primary scaffolds.
Third and Subsequent Years
Light corrective pruning should maintain the open center. Thin out and shorten inside limbs to prevent shading. Prune every year to keep the tree within its allotted space and to prevent limb breakage. Remove vigorous upright branches and leave the less vigorous ones. Head back limbs to encourage development of new fruiting wood.
Pruning Mature Fruit Trees
Modify the height and spread of mature fruit trees of any species by selective pruning. Height can be somewhat limited by removing large branches from the upper side of scaffolds, leaving only small fruit-producing shoots. Primary scaffold branches should be headed back to an outside-growing side branch to encourage lateral shoot growth. Remove or cut back damaged portions of larger branches. Maintain the open center in stone fruits to prevent shading of the interior portion of the tree. Remove prunings from the orchard area and burn or bury them. Never combine pruning of fruit trees for size, shape and fruit production with the pruning out of diseased branches.
What to Remove
Be sure to remove all dead, diseased and/or broken limbs first, then disinfect your tools before taking on general pruning. Remove weak wood and water sprouts from the interior of the tree and any suckers around the base of the trunk. These sap the strength of the tree and interfere with fruit production (Figure 6). Prune out branches that are old or shaded, along with shaded spurs on the inside of the tree. Spurs are short stems that need sunlight to bear fruit. Weak limbs under ½ inch in diameter seldom produce mature fruit and should be removed.
Remove the weaker of two crossed limbs, and any that grow back toward the center of the tree. Thinning out cuts (entire limb or shoot removal) can improve fruit set.
Where to Cut
Remove the entire limb, cutting as close as possible to the branch collar from which it is removed (Figure 7). The collar is a ridge of bark at the point of connection between branch and trunk. This lets the wound heal rapidly and reduces decay. To avoid tearing the bark from large limbs, make your first cut on the bottom of the branch to be removed, and complete the cut from above.

Incorrect Correct
Figure 7. Remove the limb as close to the branch collar as possible, cutting up from the bottom of the limb.
Remove the outer third of long, willowy branches, making the cut just above an outward pointing lateral branch or bud. This will result in an outward reaching branch instead of one that grows back into the tree and will thin the crown.

Figure 8. Avoid topping the tree on one horizontal plane.

Figure 9. Topping the tree results in weak-wooded water sprouts that will shade the tree and reduce fruiting.
Avoid making all the cuts on one horizontal plane (also called ‘hedging’ or ‘topping’ the tree) (Figure 8). Topping the tree results in a thicker, shade-producing canopy that will cause fruit production to suffer. This type of pruning results in the production.of numerous water sprouts (Figure 9) that will further shade the tree. If a tree is too tall, thin the limbs and allow the smaller laterals to predominate.
Remember
1. Prune trees in late winter or early spring, before the buds begin to swell
2. A tree that is trimmed properly when young will be less of a problem in the future. Large, healthy limbs seldom need removal if properly pruned during the first few years of growth.
3. Never leave stubs. Make cuts close to the trunk or limb just outside the branch collar.
4. Never “top” or “hedge” a tree. Make selective cuts to avoid dense regrowth.
5. Remove water sprouts and suckers as they appear
6. Do not combine pruning for size, shape and fruit production with removal of diseased wood.
7. If in doubt about removing a limb and the limb is large, leave it. If it’s a small limb, remove it.
8. Do not treat pruning wounds with tree wound paint. Research indicates that wood beneath dressed wounds rots faster than wood left undressed.
9. Be aware that you cannot substantially control the height of a tree by pruning. If you plant a standard-sized fruit tree, the tree will be large no matter how much you try to reduce its top growth.
Acknowledgements
The author would like to acknowledge the original author of this MontGuide, Dr. Bob Gough, former Extension Horticulture Specialist.sx