
Home Composting
This MontGuide describes the essential ingredients for effectively composting organic materials such as grass clippings, leaves, and some kitchen food scraps into a high-quality soil conditioner at home.
Last Updated: 11/19by Cheryl Moore-Gough, MSU Extension Horticulture Specialist and David Baumbauer, Plant Growth Center Manager
HOME COMPOSTING IS A CONTROLLED MICROBIAL
process that converts organic materials such as grass clippings, shredded branches, leaves, and some kitchen food scraps into a high-quality soil conditioner. The first organisms to inhabit the pile will be aerobic and will persist until oxygen is gone. Turning the pile allows more air to enter and aerobic composting continues. In a pile that has settled, has too much moisture, and is not mixed, the aerobic microbes will die, and anaerobic microbes will grow. Anaerobic composting produces foul-smelling gases. Aerobic composting, described in this MontGuide, can be odorless, yet requires maintenance time and labor.
Why compost?
Landscape, garden wastes and kitchen food wastes can account for up to 20 percent of the materials often disposed of in Montana landfills. As harmless as these materials may seem, they add unwanted moisture and can create gases that are explosive. These materials also take up a lot of valuable space. With fewer landfills in Montana and the difficulty and expense of siting new facilities, it may not make sense to simply dispose of these beneficial organic materials.
Compost is very similar to organic matter found in high quality, productive soils and when incorporated into the garden, increases soil quality. It adds decomposed organic material that slowly breaks down, providing nutrients to plants. Organic matter also holds water in the soil, an important reason for adding compost to sandy soils with rapid drainage. With organic matter added, soils high in clay drain better and become less sticky and easier to work. Composting garden and kitchen wastes means smaller demand on shrinking landfill space. With compost providing soil nutrients, fewer fertilizers are required, saving money and energy.
Essentials of Composting
Complete and effective composting is much like using a recipe for making a cake. It is a process of using the proper materials and mixing them to achieve the right consistency and balance. Home composting requires a careful balance of materials, organisms, moisture and oxygen. Microscopic organisms supplied with adequate water, plenty of oxygen, and a large food supply of organic materials break down wastes and produce heat. The final product is a smaller volume of dark brown, crumbly compost that has an earthy scent, contains nutrients, and when added to soil, improves its physical properties. To achieve an ideal product, the recipe should include these essentials for producing beneficial compost that can be added to your soil:
- Organic materials
- Microorganisms
- Sufficient volume of materials
- Adequate particle size of materials
- Oxygen
- Heat
- Moisture
Compost Materials
A wide variety of materials can be composted. (See Table 1, page 2.) Leaves, grass clippings, plant trimmings, straw, many non-meat kitchen scraps, and manure are excellent starting materials (Figure 1). If there is not enough material around the home, obtain material from neighbors, restaurants, grocery stores, farms and lumber mills at little or no cost (Table 2, page 3).
TABLE 1. Inputs for a home compost pile, with carbon to nitrogen ratios (C:N)
“Greens” – High nitrogen materials (less than 30:1 ratio)
-
- Yard waste including seedless weeds, plant prunings, fresh leaves and grass clippings 12-25:1
- Green vegetable plants remaining after harvest 12-25:1
- Vegetable and fruit skins and other waste 12-20:1
- Coffee grounds, tea leaves 20:1
- Horse manure 25:1
- Poultry manure (fresh) 10:1
- Poultry manure (with litter) 13-18:1
“Browns” – High carbon materials (greater than 30:1 ratio)
-
- Straw 40-100:1
- Wood chips and sawdust in small amounts 100-500:1
- Dead seedless weeds, dry leaves, and dry flowers 30-81:1
- Corn stalks 60:1
- Shredded newspaper 100-500:1
- Horse manure (with litter) 30-60:1
Do not include in a home compost pile
-
- Meat, bones, eggs, dairy products
- Human or pet waste
- Oily foods such as salad dressing, cheese, and oils
- Rhizomatous weeds such as quackgrass that can grow from root pieces
- Insect-infested or diseased plants
- Weeds with seeds

FIGURE 1. The wire bin is constructed from an eleven- foot section of four-foot tall fencing, which gives a volume slightly larger than one cubic yard. Inputs include straw (brown), grass clippings and garden debris (greens), topsoil, and water. A pitchfork makes material handling easy. Photo by Allison Rognlie.
Several materials should be avoided because they affect the composting process or the final product. Although meat scraps, bones and cheese are composted commercially, they can be slow to degrade and can attract animal pests. Dog, cat, and other carnivore manure may contain parasites that escape destruction in the composting process and should be avoided, especially if the compost will be used on vegetable crops. Don't add cooking oil, oily salad residues or grease, as they can coat materials in the pile and slow the degradation process. Do not use grass and plant clippings sprayed with herbicides or other chemicals to avoid persistence problems and negative effects on microorganisms. Don't use diseased plant material in order to prevent recurrence of diseases. Some thorny materials like rose clippings may make the compost uncomfortable to work with. Although the interior of a hot compost pile can kill most weed seeds, some seeds are heat resistant or may not get thoroughly heated. Therefore, compost nuisance weeds before their seeds mature, or keep them separate from compost that will be used in the garden. Rhizomatous weeds such as morning glory or quackgrass may also survive a pile that doesn’t heat adequately.
All organic materials consist of a certain amount of total carbon(C)/brown materials and nitrogen(N)/ green materials. Select compostable materials by their carbon/brown and nitrogen/green content. The microorganisms that feed on the material prefer a carbon to nitrogen (C:N) ratio of approximately 30 to 1 (30:1), by weight. Each material has a different C:N ratio. Generally speaking, green materials and manure have a high nitrogen content, and brown materials have a low nitrogen content. For example, dried leaves (brown materials) have a high ratio (low in nitrogen), while grass clippings and green leafy material have a lower C:N ratio (high in nitrogen). Building a home compost pile with the ideal nitrogen level is challenging, but you can usually obtain good results by alternating layers of green and brown materials. By carefully combining materials in the pile, the average C:N ratio can be brought close to 30:1.
In a balanced compost pile, enough nitrogen is added by the green material for microbes to decompose brown materials, and excess nitrogen in the green materials is utilized by microbes and not lost to the atmosphere.
TABLE 2. Sourcing compost inputs
| Material | Source | Comments |
| Coffee grounds | Restaurants, coffee shops | High in nitrogen (N) |
| Conifer needles | Woods, cast needles from landscape plants | When fresh these are acidic, but composting reduces acidity |
| Eggshells | Restaurants | Grind or mash. High in calcium. |
| Fruit skins/mash | Restaurants, canneries, brandy distilleries | Nutrients vary |
| Grass clippings | Lawn services, neighbors | Do not use where herbicides were applied. High in N. |
| Straw/hay | Farms | Alfalfa is high in N. Most are high in carbon and break down slowly. |
| Leaves | Curbside, neighbors | Can contain growth inhibitors. Shred or run over with lawn mower before adding. |
| Manure | Farms, feedlots | N content varies with animal and feed. Do not use manure from carnivores. |
| Sawdust and wood shavings | Carpentry shops, arborists | Breaks down slowly, especially larger pieces. High in C. |
| Spent brewers and distillery grain | Breweries, distilleries, home brewers | High in N, protein, and fiber |
| Stable bedding | Farms, stables | Contains bedding material, urine, and possibly manure. Carbon source |
| Vegetable waste | Restaurants, food stores, farms, market gardens | C:N ratio varies |
Herbicide Carryover
Be careful when composting manure, straw or hay from sources where you cannot verify the materials have not been exposed to herbicides containing the active ingredients picloram, clopyralid, aminopyralid or aminocyclopyrachlor. These herbicides are commonly used by agricultural producers to manage broadleaf weeds in small grain crops, pastures, and rangelands and may persist up to four years, remaining active even after passing through an animal’s digestive system. These herbicides may remain active even after the composting process is complete. Details on herbicide carryover, brand names, and how to perform a simple bioassay for residual herbicides may be found in the 'Montana Herbicide Carryover Brochure' (http://www. pesticides.montana.edu/documents/references/ Montana%20Herbicide%20Carryover%20 Booklet%2011-2011%20LO-RES.pdf).
Microorganisms
Essential to rapid decomposition of organic materials are microorganisms, bacteria and fungi; plus insects and worms. The proper type and balance of organic materials provides food and protein for microorganisms to live and reproduce. Microorganisms are already present on dead plant material introduced to the compost pile. However, to boost the organic level of the pile, add a shovel full of rich soil.
Volume of Materials
The volume size of the organic material is critical. While a larger pile of material will break down faster than a smaller pile, larger piles are also more difficult to manage. To maintain optimum moisture and temperature levels, create a pile that contacts the earth with a size of 3 feet wide by 3 feet deep by 3 feet high at a minimum. In locations with widely varying daily temperatures, volume could be increased, but for easy turning it should not exceed 4 feet by 4 feet by 4 feet.
Earth Contact Pile Tips
- The volume of materials in the compost pile should be equal on all sides as the pile is built. Tapered, flat and narrow piles will not heat up or maintain consistent moisture and heat levels for effective composting.
- In cold climates, insulate the pile sides with hay/ straw bales and the top with rigid insulation panels to help create and hold heat in the pile.
Particle Size of Materials
Shredded materials will compost faster. However, coarser materials, although prone to drying, add porosity to a pile and help air come in contact with materials. Conversely, fine-sized materials hold moisture, but can get matted down. Small branches can be clipped into pieces two to three inches long, mechanically shredded and cautiously reduced in size with a lawn mower. Heavier branches, larger than a quarter inch in diameter should be chopped, shredded or avoided.
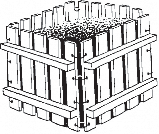
FIGURE 2. Wooden pallet bin.
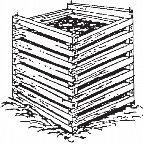
FIGURE 3. Lehigh-Keston bin.
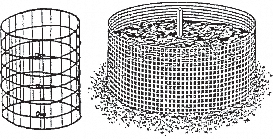
FIGURE 4. Wire mesh compost bins.
Oxygen/Aeration
Composting requires introducing oxygen into the pile. This is referred to as “aeration.” Aeration is simply turning the materials in the pile or bin with a shovel or fork.
How often to turn the pile to introduce oxygen is generally a function of pile odor and its temperature. However, while turning the pile to introduce oxygen is essential, it is a timing balancing act. Turning the pile too often will cool the pile and slow decompositionl. On the other hand, not turning enough will cause the pile to go anaerobic (composting without oxygen). Anaerobic composting produces foul smelling gases.
Temperature/Heat
The next consideration of home composting is controlling the temperature of the compost pile. While decomposition will take place at temperatures between 50° and 105°F (referred to as “mesophilic” temperatures) the optimum pile temperature is between 110° and 150°F. It is also within these temperatures that most pathogens will be destroyed (131°F) and weed seeds and fly larvae killed (145°F). To create and maintain this temperature range:
- Use a thermometer to monitor temperatures on the inside of the pile. (24 to 36-inch compost thermometers are readily available.)
- For free-standing piles and bins, maintain optimum material size of 3 feet by 3 feet by 3 feet (a cubic yard). Constructing a wire bin from an eleven-foot section of four-foot tall fencing, will give you this size pile (Figure 1, page 2).
- Protect the pile from direct wind.
- Insulate the pile on the sides and top during cold weather.
- Periodically turn compost materials on the outside of the pile to the inside of the pile.
Moisture
Moisture plays an important role in home composting. It provides the mechanism for microbe movement, nutrient transport and chemical reactions. However, like most of the essentials of composting, it is critical to monitor the amount of moisture that goes into the pile. Too much moisture will mat down the materials, leach out valuable nutrients, and block oxygen to the pile. Too little moisture will dry the pile and will not support microbial growth. As a rule, never dump water onto the compost pile. Sprinkle water gently into the compost materials as the pile is being built and thereafter when it starts to dry out. To gauge the proper moisture level in the pile, sprinkle water in so that the material is moist (like a damp, wrung out sponge) but not soggy.
Home Compost Container Options
The most popular method of backyard home composting is to pile layers of material on the ground. Rapid microbial activity is achieved, and heat is produced in the pile by regular turning and adding water when needed. This type of composting can be done in a homemade or commercially available bin or with free-standing earth contact piles that can be built but which are likely to take up more space. The purpose of a container is to hold the compost in a shape conducive to microbial growth and make turning easier. The main requirements for a container are openings on the sides for air exchange, and easy access for turning the contents.
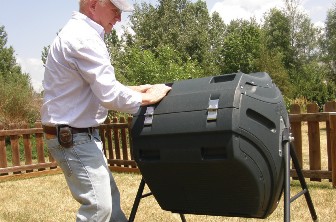
FIGURE 5. Purchased compost tumblers. Photo by Cheryl Moore-Gough
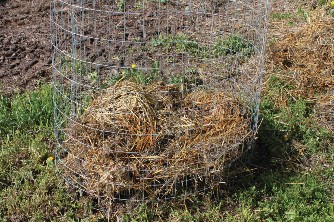
FIGURE 6. First layer, browns. Start with coarse materials to facilitate drainage of excess water. Photo by Allison Rognlie.
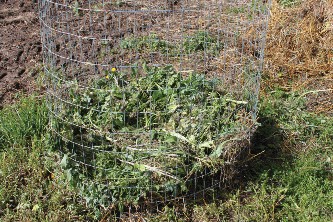
FIGURE 7. Second layer, greens. Grass clippings, weeds and garden debris make up the greens layer for this pile. Manure is not required but is an excellent source of nitrogen. Photo by Allison Rognlie.
Homemade bins should be constructed of material that is easily moved. Turning the pile is essential, and the easiest way to do that is to remove and relocate the frame using a pitchfork to move the contents to the new location. This effectively mixes the contents.
Detailed construction information is available online for these and many other systems:
Wooden pallet bin (Figure 2, page 4)
- Constructed of four upended pallets with corners wired together into a square
- Works well in small yards
- Easily moved for turning by releasing the wires
- Turn compost into the bin in its new location
Lehigh-Keston bin (Figure 3, page 4)
- Constructed with wooden slats
- Drill holes at the ends of each slat from top to bottom
- Fasten together by inserting a metal rod through the holes to form the box
- Remove the rods and reconstruct in new location
- Move the pile into the bin in its new location
Wire mesh bin (Figure 4, page 4)
- Constructed from an eleven-foot section of four-foot fencing
- Bring both ends together and fasten with metal clips or wire
- Lightweight
- Remove clips or wire or pull wire up and off the pile to relocate
Snow fence bin
- Constructed like wire mesh bin using snow fencing
- Remove wire or clips and peel off fencing to turn
- Rebuild and turn into bin in new location
Purchased compost tumblers (Figure 5, page 5)
- Many styles are available; larger tumblers compost more efficiently than small
- Intended to make turning easier
- Adding additional material slows composting
- Two tumblers speed the process, one to actively feed and the other to “cook”
- Typically produces compost that is rougher in texture.
Building the Pile
To establish a compost pile, start by placing alternating layers of materials into a container (Figures 6-7, page 5). The compost pile should be three to four feet on each side, to allow retention of generated heat and air diffusion. Insulation, such as hay bales, may reduce the necessary size. As you place alternating layers of material in the container, sprinkle water in so that the material is moist but not soggy (Figure 8).
FIGURE 8. Sprinkle water to moisten, but not saturate the pile. Photo by Allison Rognlie.
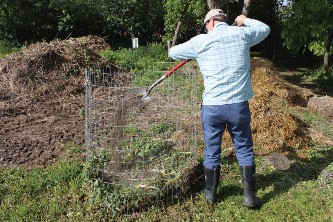
FIGURE 9. A shovelful of garden soil acts as a microbe inoculant. Photo by Allison Rognlie.
As layers are added, sprinkle a handful or two of topsoil or compost in between layers to supply a source of microorganisms (Figure 9). A thin layer or two of soil interspersed in the pile can also absorb odors. Although airborne microbes or those directly on the materials will usually start the composting process, one of the best additives to use to start composting is herbicide-free horse manure. Commercial additives or activators containing nitrogen are available but may be replaced by other less costly sources of nitrogen.
Maintaining the Pile
The pile is ready to turn when the internal temperature has been at 140°F for a few days (Figure 10, page 7). A pitchfork is a useful tool for turning the pile (Figure 11, page 7). Make an effort to incorporate the materials from the outside of the pile into the center of the turned pile. Sprinkle water as you turn if the materials are dry (Figure 12). Avoid adding new materials to an established compost pile, instead use them to start a second pile.
Compost Troubleshooting
Table 3 (page 6) offers suggestions to troubleshoot a problem compost pile. Most problems are solved by having adequate air, the right moisture content, and the correct C:N ratio. High or low nitrogen materials can be added to correct an imbalance.
Occasionally, the microbes need a little more phosphorus than is contained in the materials. A handful of fertilizer may be helpful.
Keep in mind these factors when deciding on the best location: a sunny location can help heat the pile but will accelerate drying. A windy location will cause chilling in addition to drying.
These problems can be remedied with a roof or a windbreak. A site with adequate drainage is helpful to prevent puddling. Composting may be done on bare soil, sod, or low vegetation, where soil contact exposes the pile to microorganisms. A pile can be built on concrete or asphalt if necessary. Any runoff can be collected and used to water plants. Building close to the garden is convenient. Keeping the pile moist is easier if it is built within reach of a hose. Compost piles should not be built near wellhead areas which are sensitive to surface contamination.
TABLE 3. Compost troubleshooting
| Problem | Possible Causes | Solution |
| Rotten odor | Excess moisture or compaction | Turn pile, or add dry porous material such as sawdust, wood chips, or straw |
| Ammonia odor | Lack of carbon (too much nitrogen) | Add high carbon material like dry leaves, woodchips, or straw |
Low pile temperature |
Pile is too small | Increase size, insulate sides if possible |
| Too little moisture | Add water and turn | |
| Poor aeration | Turn pile or aerate | |
| Not enough nitrogen | Add high nitrogen source like grass clippings or horse manure | |
| Cold weather | Increase pile size or insulate if possible | |
| High pile temperature (over 150°F) | Insufficient ventilation | Turn pile |
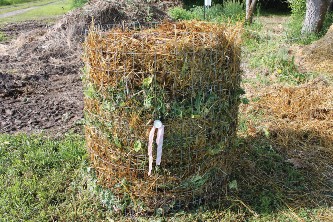
FIGURE 10. A compost thermometer is a nice accessory to determine when to turn the pile. Photo by Allison Rognlie.
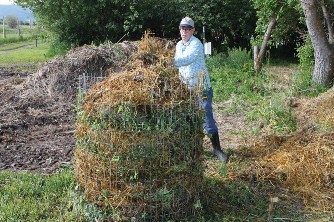
FIGURE 11. The final layer should be straw, which will insulate the pile and hold the heat in. Photo by Allison Rognlie.
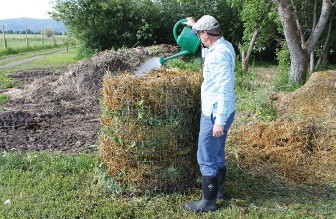
FIGURE 12. Compost piles often become too dry in Montana's sunny and windy conditions. Add water to the pile as needed. Photo by Allison Rognlie.
Finished Compost Product
The final product will be a dark brown material, and the pile will have cooled to air temperature. Unfinished clumps can be separated by screening, with the clumps going into a new pile. An initial application of one to two inches of compost to flower and vegetable gardens beds can be incorporated with a rototiller into the top six inches of soil and will improve the tilth of garden soil. During subsequent years, a half inch of compost raked into the top two inches will help maintain soil tilth. While compost contains some plant nutrients, it is not a replacement for fertilizer. Periodic soil testing with either a home test kit or commercial laboratory is necessary for determining proper nutrient levels for optimum garden performance. See the ‘Home Garden Soil Testing and Fertilizer Guidelines’ MontGuide for details on soil testing and garden soil fertility management (https://store.msuextension.org/ Products/Home-Garden-Soil-Testing-and-Fertilizer- Guidelines__MT200705AG.aspx). Small amounts of finished compost can be added any time to gardens if you take care to prevent damage to roots while digging and only work it in to the top inch of soil, or use it as mulch. Some composting gardeners make a compost tea by placing compost in a burlap sack and soaking in a barrel of water. This nutrient-rich tea can be used to water plants and the compost can be added to the soil at a convenient time or used as a surface mulch. Finely screened compost with particles smaller than 3/8” may be incorporated into potting mixes to increase the population of beneficial soil microbes. Ten to twenty percent by volume is an appropriate amount of compost to add when blending into potting mixes.
Successful composting takes practice and patience, but the results are satisfying as the home gardener builds soil quality.
Acknowledgements
The authors would like to acknowledge the original author of this MontGuide, Michael P. Vogel, former Housing and Environmental Quality Specialist.

